It's not Led Zeppelin, it's our latest home project! I am quite ecstatic to reveal our staircase "renOHLvation" if you will. Ever since we moved into our house, 4 years ago, I've thought about removing the carpet from the stairs. The risk, however, was that we didn't know if there were hardwoods underneath or what condition they were in. So the shaggy old carpet stayed. Until I couldn't look at it any longer. Andrew and I agreed that we would take the risk and start ripping it off. If the stairs were in good shape, we would re-finish and paint them. If they were in bad shape, we would have new carpet installed.
Let's take a look at the BEFORE. The walls were sponge painted a strange grayish-bluish-white when we moved in. It was hard to look at.
So we painted it a light green, along with the dining/sitting room. A choice I now question, but when we moved in, and actually had the liberty of painting an entire house whatever color(s) we wanted, I went a little crazy. I like color. What can I say? It was a nice green, it just didn't go with the rest of the house.
Take a look at this carpet in all it's speckled-shaggy-goodness.
We took the plunge and started to rip it out! Which required the use of my husbands muscles. I have no upper body strength. It's sad.
Bye-bye carpet! This is what we were left with. Carpet padding + 9,000 staples.
The wood didn't look half bad! Praise the Lord! It would need to be cleaned up, stained and painted, but there weren't any major defects. Phew! I could see it all coming together...
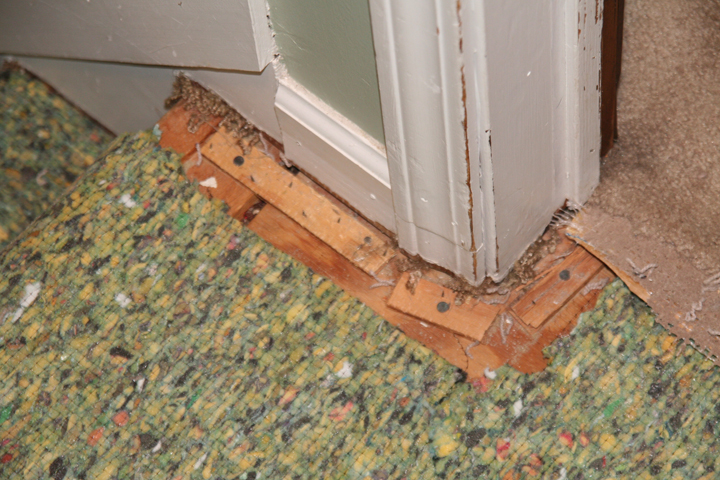
We did discover just plywood at the top of the landing. Whomp whomp. We will need to cover this spot with laminate flooring, but that is another project for another day.
I also discovered a little piece of history. I get a big kick out of this type of stuff. See that little peach doted patch? This wallpaper used to be in the hall. How funny.
Now for some work...
I ripped out so many staples with these tools, my hand hurt for 2 days. See that bucket? Full of staples! I would like to thank the carpet installers of this house's past, for being so thorough and using SO MANY STAPLES. Really. Thank you.
Once THAT was done, we had bare steps that needed to be sanded. We used a small hand sander regular sand paper. I say "we" a lot, but Andrew did the hardest work and I helped him when it was something I could handle. Or that he trusted me with. The hand sander is the most advanced power tool I use.
Once the stairs were prepped, it was time to prime the treads white and stain the wood. We used Rustoleum Ultimate Wood Stain in light walnut.
The second step was tested first. I loved the color immediately! It was a close match to the existing bannister and not too far from the floor color.
It turned out so beautiful!
Even better than I imagined! We painted the walls our favorite light tan, "Kilim Beige" by Sherwin Williams, which was leftover from the kitchen and upstairs bathroom. We also had enough white paint for the treads from another project. The only real investment was the wood stain, clear polyurethane and our own labor. More so my husbands labor. A labor of love to make my staircase dreams come true!
I just love the wood grain! It makes the whole hall look so fresh and bright.
The only thing missing is this old railing. I didn't want to put it back up. Is it really necessary? No, I don't want people falling down my stairs, but it's kind of ruins the look of the smooth clean wall. I don't miss it. We're going to leave it off for now. Andrew holds to the argument that it's a house code law that you have to have a railing. If we ever do have to put it back up, it's in the garage.
One last look at the before and after. What a difference! I couldn't be happier! Yes, the stairs are a little more creaky. Yes, they are a tad on the slippery side, compared to carpet. But does it look waaaay better? Yes! Is it funny to watch our cats run up them and occasionally slip? Yes! No. Kidding!
I owe the biggest THANK YOU EVER to my does-it-all-handy-man-husband, Andrew. You made my vision for these stairs come to life! Thank you for the many hours, hard work and sweat you invested. You are the best painter I know! And I love you for going along with my home project schemes and helping me accomplish things like this that make me happy. I love you. And I love sharing our home and working on it together.


Love it ! Great Job. Steph www.bargainfun.net
ReplyDeleteThanks Steph!!
ReplyDeleteI love your stair makeover! I've wanted to do something similar to my 2 staircases and you've given me courage to try! Visting from Not Just a House Wife!
ReplyDeleteWhat did you ever do with the landing at the top of the stairs? Would you mind taking a picture? I am actually doing the exact same thing as you and have a landing just like yours. it's plywood. I thought about putting wood flooring over it but am not sure what to do with the edge of the top stair/bull nose and how it would match up. I think putting laminate would raise the floor height too much and I wouldn't be able to put a nose on the edge of the top stair without it showing the plywood underneath. ANYWAY I realize your post was 4 years ago- but maybe you'll see this! Thanks!
ReplyDeleteHi there! Thanks for checking out our staircase project and for your question. I actually posted the top of the staircase landing project here http://sohldesign.blogspot.com/2011/11/laminate-landing-patch-job.html (2 months later, sorry). The edge of the top stair was the trickiest/worst part. We added a strip to cover up the seam, but it is raised a bit. Not ideal, but did the job! Good luck to you! I would love to see how your staircase turns out. I also can't believe it's been 5 years since we did this. SO worth it.
Delete