Saturday, October 30, 2010

Creative Bathroom Storage for Small Spaces


If your bathroom is on the small side, storage options can be limited, so you need to be creative. When we remodeled our main bathroom (the biggest project of our lives), we chose to eliminate the former closet. This meant there would no longer be a door to hide untidy shelves and a massive pile of dirty laundry. This white shelving unit now serves as primary storage, with the addition of different baskets and containers. I bought the shelf at Christmas Tree Shops when we first moved into the house. It turned out to be a great purchase for not a lot of money.


The top portion has three shelves (four if you count the very top), and the bottom has three shelves, enclosed by an opaque door. Behind the opaque door, we stash not-so-sightly toiletries. 


When I was growing up, someone was always looking for tweezers. Eyebrow maintenance, sliver removal, jewelry repair - tweezers were a hot item in our house. And there was one really good pair. Anyone else run into this? I decided to put a set of grooming tools in each of our bathrooms. Scissors, tweezers, nail clippers, etc. I keep them in what used to be glass candle holders. Now they always have a home.


Did you know that you can re-use glass candles holders, like the Glade or Fabreze ones? They probably don't recommend doing this, but once the candle has burned as low as it will go, I just put it in the microwave for a few seconds. Then I loosen the remaining wax and wick with a craft stick, toothpick, or pencil, and throw the wax away. You might need to microwave it a couple of times to get everything out. Then wash it with dish soap and use it for something else! They come in handy for storing just about anything small - loose change, pens, that one earring without a mate. This one had stars on it from a Christmas scented candle, but the clear glass ones look great.


To store more unsightly items, this plastic basket fit perfectly on one shelf. It came from my husbands college days. He can just throw his razor charger, toothpaste, contacts and anything else in there.


Movin' on up...the first open shelf has items that I don't mind being out. Tissues, a candle and a small container. At first they were sitting right on the white shelf, but it looked a bit empty and clinical. So I added a shallow basket to contain them all. Such a small thing made a big difference. I think the basket looks much nicer, don't you?


The turquoise mini ceramic flower pot (found at Christmas Tree Shops) holds toothpicks, for easy access. I got this idea from my friend Morgan. She had them in a glass apothecary jar in her bathroom, and I thought it was a great idea. My husband lives for toothpicks. He had them all over the house. Now they are pretty much here whenever he needs one.


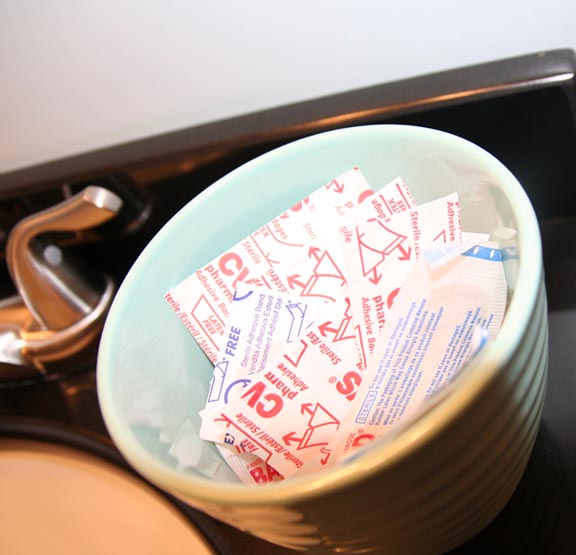
The next open shelf has another flower pot which holds Band-Aids (I know Band-Aid is the brand, not the product, but it sounds funny calling them "bandages"). For some reason, someone always needs a Band-Aid in our house. Someone who bites their nails until they bleed. I'll give you a clue: it's not me.


I found these cute little baskets at Wal-mart (a place I try to avoid at all costs, unless it's for stuff like this). They fit four Bath & Body Works bottles perfectly. "Free creams and lotions..." name that movie!


The top shelf is just wide enough to house a medium size basket with fabric lining (also from Christmas Tree Shops). This one acts as a catch-all for miscellaneous items, hair things, extra cotton balls, etc.


I put the matching larger basket on the very top of the shelving unit, because it didn't fit anywhere else. It keeps a hair dryer and the occasional curling iron.


I like how neatly tucked away everything looks.


Across from that, is another tall narrow wine-rack-turned-storage-unit, where the closet formerly was. I keep two baskets up there. I guess you could say I really like baskets.


One is for extra toilet paper (gotta have it), and the other is for over-the-counter medicines and ointments.


Does the Gold Bond, Icy Hot, and ankle bandage make us look old? Thought so.

One of the worst things that can ever happen is running out of toilet paper, so I made sure there was an extra roll stashed near le toilette, at all times. I put a roll in another one of those cute little baskets.


Along with a little bottle of room freshener spray. You know what it's for.


On the glass shelf above the toilet, sit my favorite little glass containers with silver lids, that hold cotton balls and Q-tips (again, Q-tip is a brand, but it sounds better than cotton swab!). I love these containers.


The vanity does have space behind it's double doors for stashing more stuff.


It's kind of awkward to keep fetching things from down there, so I reserve it for cleaning supplies and guest toiletries. Plus, that darn u-shaped sink drain is right in the way. I thought about putting in some type of shelf to maximize space, but decided it wasn't worth it. I did manage to fit a white plastic basket to hold spray bottles and such.


Speaking of cleaning products, my favorite bathroom cleaner is Method's Tub and Tile spray, in eucalyptus mint scent. It smells really nice and does a number on soap scum and all that gross stuff no one wants to clean.


One last storage tidbit. Tucked next to the guest towels, on the tower shelves, I placed one of my milk glass pedestal bowls. I filled it with guest shampoo, lotions and a shower cap, thanks to some nice hotel visits. I got the idea from Christy, who has one in her guest bedroom.


There you have it. Some creative bathroom storage ideas for small spaces. All you need are a few baskets, different containers, maybe some shelves and organization. Most of all, make sure it's functional and what works best for you. Don't let limited square footage stop you from making the most of your space!

Thursday, October 28, 2010

The Big Frame Up, Featured on Remodelaholic


Have you visited Remodelaholic before? It's one of my favorite blogs, packed with before and afters, home decor projects, recipes and tons of creativity. You should check it out if you haven't already. I am always inspired by something I find there.

I am especially thrilled to share that I am being featured on Remodelaholic for Framing Many Random Sized Pictures, in The Big Frame Up post, that I did earlier this year. What an honor! Thanks so much for the opportunity and for such kind comments! 

Happy framing!

Sunday, October 24, 2010

More Baby Bibs and Diaper Burp Cloths


I have been sewing up a storm lately for some very special babies. I have quite a few friends that are expecting, so I jumped at the opportunity to make some more bibs and burp cloths for gifts. I found a burp cloth design that I like much better, that involves using cloth diapers and sewing a fabric panel down the center. The tutorial can be found here, at Chickpea Sewing Studio.

I started with a 12 pack of 3-ply cloth diapers that I found at Target.

I washed all of them, as well as my fabric, in mild detergent and removed any fuzzies.

 
Then I measured and cut the fabric for the center panel. I found that 19 inches by 7 inches works well.


I turned the fabric over, folded and ironed each short side to be about 1/4 inch shorter than the cloth diaper ends. Then I folded the long sides and ironed them as well. It just depends how wide you want your fabric panel to be. I tried to make it as wide as the center panel of the diaper, however, it won't be perfect.


I turned the ironed fabric right side up and pinned it in place.


 Then I sewed all four sides with my sewing machine, using a medium zig-zag stitch.


The result is an adorable diaper burp cloth. Perfect for catching all of those messy burps and feeding spills.


I made a bib to match, out of one of my favorite fabrics for baby girls in brown with cute little pink, purple, blue and green owls.


I also made some sets for baby boys with this adorable tan, blue, green and red owl fabric. Owls are all the rage these days, in case you haven't noticed. I love them!


Some polka dots too.


This floral set is one of the fabrics used in Madelyn's room. She should be arriving any day now....


Bibs and diaper burp cloths are so cute and relatively easy to make. From what I have heard, Mom's love them. The bib instructions can be found here, also at Chickpea Sewing Studio. Make sure you print out the paper template at 100%, or else you will have tiny bibs.

I can't wait to see my friends babies wearing these bibs around their little necks! Keeping their clothes dry and clean.

Sunday, October 17, 2010

Michele & Aaron's Wedding


Congratulations to the new Mr. & Mrs. Wild! The happy couple looked amazing and their wedding was one of the most beautiful weddings I have ever been to. It seriously could have been on the pages of Martha Stewart. Michele and Aaron worked overtime on every single detail, and it showed.


Their ceremony and reception took place at Hamlin Beach State Park. The same beach where Andrew and I spent a relaxing summer day. The seasons have certainly changed. This was a picture perfect fall day. Red and gold leaves on the trees and scattering the ground. A backdrop of rolling waves. The sun was just starting to sink toward the horizon as guests took their seats for the outdoor evening ceremony.


It was a gorgeous setting! We were praying for no rain, and were so thankful that it didn't. It is mid October though, so I'm not gonna lie, it was cold out there. The bride and bridesmaids were real troopers for standing out there in strapless gowns!


Michele and Aaron looked so happy. Their big day was finally here!


The aisle was decorated with hanging mason jars of white hydrangeas, leaves and muslin.


We got to celebrate with some of our very favorite people, which made the day that much more fun!


Aaron and Michele sealed the deal with a kiss and were presented as husband and wife!


Everyone headed to the nearby lodge and tent immediately for the reception. There was heat in there! Including a roaring fireplace.


The venue was sectioned into three areas, all decorated spectacularly with pumpkins, candles, lights, leaves and all things fall. It. Was. Beautiful. I still can't get over every detail. My camera did not do it justice. 


The twine globes wrapped with lights were amazing. I'm pretty sure they made all of them.


Little tiny pumpkins carved out to hold candles. 


Medium size pumpkins carved out as centerpieces to hold flowers.


The orange lanterns hanging from the ceiling were such a perfect touch.


The cake, surrounded by candles and lights. Everything had such a warm glow and felt so romantic. 


This one is a little blurry, but I couldn't leave out the cookie table. They even provided little gift bags to put cookies in. Next to that, was the popcorn and candy bar! Love it.

Photo courtesy of Brette-Ashley


There was so much I wanted to look at. The girls and I kept "oohing" and "aaahing" over every detail. Simply stunning. Definitely a fall wedding to remember. Aaron and Michele are a great couple. Their wedding day was a perfect reflection of their love for each other and for their family and friends. 

They even went as far as to decorate the bathrooms! Now that is love.


And to think, you pulled this gorgeous wedding together in three months?! Simply amazing. How did you do it? I know how empty and plain those lodges look the rest of the year. What a total transformation into something beautiful. You deserve a very long vacation. And maybe bride-of-the-year award. And groom-of-the-year award.


We are so blessed that we could share in your wedding day! We love you both and pray that the Lord richly blesses your marriage. 

Michele, I gotta say it, you were born to be Wild! Mrs. Wild! Congratulations!