Sunday, November 17, 2013

Pocket Wedding Invitation


This summer, I designed an elegant pocket wedding invitation set for a sweet bride and groom. I went to high school with Tom and also designed his sister Nicole's wedding invitations a couple years ago. I was excited to design a pocket style invitation and see all the pieces come together. I ordered the pockets, envelopes and belly bands from CardsandPockets.com. Everything arrived as expected and the quality of the materials is really nice. I printed the inserts and initial seal locally. 


I mocked everything up during the design stage to present how the completed set would look. I really like the simplicity and elegance of this design. I also like Jesssica's choice of colors - slate gray, silver and fuchsia. So pretty! Matches my blog too. 


The happy couple wed yesterday! I got a sneak peek of their wedding photos (via FB of course). 


How cute are they? Stunning. (This is one of Jessica's photos)


Beautiful new sisters, Jessica and Nicole. (Another one of Jessica's photos)

Congratulations to the new Mr. and Mrs. Resser! May God bless your marriage and new life together. Thank you for allowing me to design your invitations! 

Monday, November 11, 2013

Side Table Facelift


Confession #1: I really don't like painting furniture. In fact, I hate painting furniture. But I still always want to, because the results are so amazing. It's usually worth the effort in the end.

Confession #2: I admit to curb-side shopping (also known as garbage picking). I prefer to think of it as thrifty repurposing. This darling little side table was one such find from a certain neighbor's trash night. I saved it! There was nothing wrong with it, just some dust and light wear and tear. Perfectly good junk treasure, I say! 

It sat in my kitchen for a couple years, holding a basket of snacks and cookbooks. Plain 'ol boring brown wood. I often thought about painting it.

Then, when I started assembling and styling my home office, I needed a little side table next to my reading chair. Something small that wouldn't take up much space, but big enough to hold a coffee mug, yet be decorative. I wish you could have seen the light bulb that went on in my head. 

This curbside salvage was a perfect fit! And it was time to dress it up with some quick color. 

Did you know that Home Depot sells 8oz paint samples for $2.94? Did you know that a little jar like this can paint a couple of small projects? It does. I painted one coat on this table and one coat on a large wooden frame and only used about half of it. Yeah! I used flat paint in the color "venus teal". A nice dusty aqua/teal/gray. It covered really well too. 

Next time you have a small painting project, you could buy one of these samples in your choice of color, instead of buying a whole quart or gallon. This secret almost makes me want to paint another piece of furniture sitting in my basement...

Saturday, November 9, 2013

Painted Red Chandelier


One of the first home office projects I couldn't wait to try, was painting a chandelier a bright bold color. What's bolder than red, right? My challenge was to find a second hand chandelier on the cheap that I wouldn't be afraid to paint (or mess up). It took some time scouring thrift shops and Craigslist to find the right one. 


I hit the jackpot when I found this light fixture on Craigslist, new, still in the box, for $12! It was the perfect size, just not the color I had in mind. 


Faux bronze chandelier, meet glossy red can of spray paint. This paint really gave it a high gloss lacker look, which I have been seeing everywhere lately. 

I rigged up a spray painting setup in the backyard, using a shepherds hook to suspend the chandelier. I covered the electrical cords with a plastic bag and stuffed paper into the sockets. 

It took 3-4 coats of the glossy red paint to completely cover every nook and cranny. I instantly loved it! 


I couldn't wait to see it in the new room. Andrew helped me switch out the old fixture and install this beauty.The cord and chain were a bit tricky but we made it work. I chose to use round light bulbs to make it a little more modern. This room used to be somewhat dark, but now there's tons of light! This little chandelier is both beautiful and functional. So bright! 

These are some chandeliers (found via Pinterest) that inspired me to even try such a dramatic project. I just love the fun pop of color and interest that it adds. 


If you have an old chandelier hanging around (pun intended) or find one at a thrift shop, don't be afraid to give it new life. It's amazing what spray paint and new bulbs can do!


Sunday, October 27, 2013

Home Office Makeover Reveal

It's the moment I've been waiting for! I know some of you have been anxiously waiting to see my big office makeover reveal. I've been putting the finishing touches on my completely transformed space for the last couple of weeks and I absolutely LOVE it! The room is dramatically different. Every inch of it was updated, right down to the carpet. It really is a dream come true! I'm so happy with the way everything turned out and I have many DIY projects to share with you. First, I want to say a huge thank you to my home renovating partner in crime, my husband, Andrew. He's the muscle and brains behind my madness and I couldn't have done it without his help and support! 

Let's take a quick look at the BEFORE. There was old green carpet, dark teal walls, a variety of furniture throughout the years and a lack of storage and workspace. You can see more of the way it used to look here and here.


Without further ado, this is what it looks like NOW!


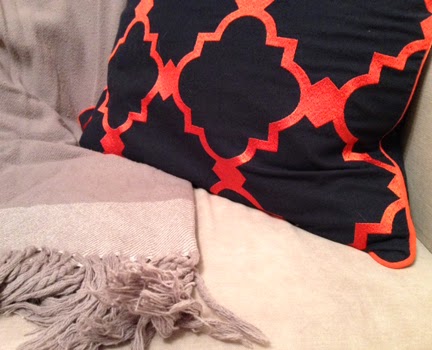
Sitting in the armchair with that pretty pillow and newly painted side table is my new favorite spot. I'm over the moon for the red chandelier. I made 3 different types of message boards - framed cork, burlap with nail head trim and a chalk board. We gave the room new paint. I reupholstered my old desk chair that I was about to kick to the curb. We built a 10 foot desk. We purchased and assembled 3 cabinets. I brought new life to items I already had around the house. I sewed, glued, spray painted, sanded, stained, shopped, styled and imagined my home office from start to finish. It was so worth it! 

I now have more storage than I know what to do with (we'll see how long that lasts). I feel inspired and organized. I have plenty of room to work, create and relax. Some days I just sit in there and look around. I am so blessed to have this space and the means to turn it into something functional and beautiful.

It was a really fun project! I have lots to share about how I did it and how I was able to use existing, found, thrifted and new items to create a cohesive room. Thank you for being patient while I dedicated my extra time to this project. I hope you enjoy looking around!


Weekend French Toast

I love French toast. Growing up, my Mom would often make French toast for me before school. It was the best. Ever. This week, I was at a photo shoot for breakfast foods, and one of the components was French toast. Since then, it's been on my "must make" list. This weekend, I found an easy recipe and tweaked it a little bit, using thick slices of farm-style white bread. The thicker the bread, the better. 

Ingredients:
1 thick slice of bread
1 egg
2 Tbsp milk
1 tsp sugar
A few dashes of cinnamon
A small dash of vanilla extract
1 tsp butter

Directions:
Whisk egg, milk, sugar, cinnamon and vanilla in a shallow bowl. Dip one side of the bread in the liquid and let it soak for a moment. Turn over the bread and let the other side soak up the rest of the liquid. Melt the butter in a frying pan. Slide the soaked toast into the frying pan and cook over medium heat for 3-5 minutes each side. Check to make sure it's not burning out getting too dark. Repeat recipe for multiple slices of toast.

My favorite toppings are powdered sugar and maple syrup. Such a delicious breakfast - especially on a cold weekend day! 

Thursday, October 10, 2013

Home Office Makeover Sneak Peak


I've been hard at work giving my home office/craft room a full makeover (which is why my posts have been scarce lately). I am SO excited to share the big reveal with you, but it's not ready just yet. Patience. Almost there. I am absolutely thrilled with how it's looks - such a transformation! To give you a glimpse into my excitement, here's a few sneak peaks for you.


This may be my new favorite room in our house. Stay tuned!

Saturday, October 5, 2013

4 Year Blog Anniversary Giveaway Winner


Drum roll please...

The winner of my blog anniversary giveaway is...Kimi!

Congratulations Kimi! You are now the owner of 1 pair of light pink rosebud earrings and 1 zipper wristlet, made by me.

Thank you, to all 4 of you lovely ladies for entering! Makes me wonder if anyone else is actually reading this... 

Enjoy your Saturday! 
Hugs,
Sohl