Thursday, June 28, 2012

Peanut Butter Cup Chocolate Cake Mix Cookies

I was recently introduced to these amazingly decadent chocolate peanut butter cup cookies, by a new friend and blogger, Beka. I asked her for the recipe, which she found here. Not only are these cookies delicious, they are SO easy to make. I think it took me longer to edit photos and write this, than it did to whip up a batch of these sweet treats.

Ingredients:

1 box chocolate cake mix
2 eggs
1/3 cup canola or vegetable oil
1 8oz bag Reese's Peanut Butter Cup mini's OR 12 pack of regular size, chopped up

Directions:

1. Preheat oven to 350 degrees
2. Mix together cake mix, oil and eggs until combined. Gently stir in peanut butter cup pieces.
3. Roll dough into tablespoon sized balls and bake for 8-9 minutes.

Your kitchen will look like you went on a candy binge. 

 I scooped them onto cookie sheets with a measuring tablespoon.

Recipe makes 24 rich and indulgent can't-have-just-one cookies. Enjoy!

Saturday, June 23, 2012

Hit the Deck

I want to start this post by saying how thankful I am to have a husband who knows how to skillfully wield a paint brush. He learned from the best - my father-in-law, Denny, owns his own painting company. Andrew did an amazing job staining our decks!


In an effort to continue "beautifying" our home's exterior, we decided it was time to stain both the front and back decks. A task no one wants to do. I can hear the groans of those reading this just thinking about it. Andrew tackled the smaller front deck on his own, to see how it would go.


He power-washed it in the fall, but we didn't actually start staining until Memorial Day weekend. We needed a stretch of weather without rain (and the motivation of summer) to do it. To prep the wood, he gave it a light sanding and swept it really well. 


As you can see, it was in rough shape. It looked so weathered and discolored. 


He used a large paint brush and a small roller to apply the stain.


We used Home Depot's Behr Solid Color Waterproofing Wood Stain, color "Russet." It worked beautifully, and Denny recommended it, so we knew it would be good.


The result was dramatic - what a difference! 


I love the new rich uniform color and the contrast of the sienna/brown against our tan siding.


It looks so warm and welcoming. I actually like to sit on that bench from time to time and take a little time out. 

Now that the front deck was a success, the BIG deck is next...it's only about 8 times the size of the front deck! 


Thursday, June 21, 2012

Watermelon Mojito

The weekend is almost here - whoo hoo! If you're looking to kick back with some fruity refreshment, try a watermelon mojito. It's now my second favorite summer beverage. My other favorite is a minty mojito, made using my friend Rich's recipe. I follow it exactly, including making a jar of simple syrup to keep in the fridge. That is one GOOD mojito!


The watermelon variation comes from Martha. Her recipe is quite similar, swapping out fresh muddled watermelon instead of seltzer. She uses granulated sugar, but I like to use simple syrup. Make it with or without rum. But fresh limes and mint leaves are an absolute MUST. 


Cheers to summer!

Sunday, June 17, 2012

Plant Your Own Planters

When it comes to flowers and gardening, I've found that planters and containers are easier to maintain than regular gardens, and they add a lot of color and life to your deck/patio/yard. Each year, I like to place a few plants in different outdoor areas to enjoy during the summer months. But, my goal is not to spend a lot of money on them. Picking out ready-made planters can add up - especially if you want a few. 


I have collected pots and hanging planters that I try to recycle year after year. I don't bother with ceramic ones anymore - they always crack or break at some point. Plastic ones hold up pretty well. I decided to make 6 of them.

I took a trip to the Garden Factory to pick out some plants: 12 geraniums, 12 snapdragons and 4 tall grasses for $60. It was a bit more than I intended to spend, but the prices were good and I wanted each planter to be pretty full. Geraniums are my favorite because they come in a variety of colors and blossom all summer long.

I started with the large containers first. I loosened up the old dirt and removed any leftover roots from last year. Starting with the tall grass, I made a space for it in the back, as the base. Then I added one geranium on the left and one on the right. I finished with 2 snapdragons in the front. 


I repeated the same combination and method with each container (the 2 hanging baskets don't have tall grass). When I was done, I had 6 beautiful planters! For $10 each. I doubt you could buy this same ready-made planter at a store for $10. 


One for the shepherd's hook.


Two for the front steps. 


One hanging and one at the base of our front porch. (Notice the deck is in need of new stain...more to come on that).


And one for the back deck. 


All it takes is a little creativity and willingness to get your hands dirty. A green thumb - or green pinky finger - helps too. Happy planting!


Thursday, June 14, 2012

Golf Towel for Dad

At the risk of spoiling my Father's Day surprise, here's a little something I whipped up for my Dad, who likes to golf - a custom golf towel.  It's in the mail, Dad!

Just like my embellished kitchen towels, all you need is a white dish/hand towel.


Some, "manly" golf appropriate fabric (argyle is perfect!) and 1 XL eyelet or grommet. 

Measure, cut and iron back the edges of the fabric you want to use. My finished rectangle was about 14 inches by 7 inches. You can make it wider or thinner. Just be sure to leave enough towel at the bottom. 


Turn your fabric right side up and pin it in place.


Sew all the way around all four sides. I like to use a zigzag stitch. Iron your now-attached fabric.


Mark the spot where you want the grommet to go, by tracing the inside of the ring. 


Snip a tiny hole through the fabric and towel, just large enough to fit the grommet. 


Follow the instructions for hammering the grommet in place. 


Isn't that fun? So stylish!


One more finishing touch - gotta add my label! 


Now my Dad can hook this specially made towel to his golf bag and think of me while he's out on the links! I have a feeling he'll like it.


This would make a great gift any golf enthusiast - you can customize the color to match their bag. Or incorporate their favorite sports team. Add a monogram. Make a whole set!

Monday, June 11, 2012

Thrifty Finds

I wandered into the thrift store Friday afternoon and found a few treasures.

You know I can't resist milk glass. I've been keeping an eye out for a few select vases in classic patterns that I didn't have - until now. At .49 cents each, how could I NOT get them? I have plans for these vases... I also found a sweet little candy dish.

Then I found a set of 8 "new" large mason canning jars, still in the box, with all the lids.

With commemorative liberty bell design, no less (Andrew liked that). They looked like they had never even been taken out of the box - the instruction sheet was still in there. 

I have plans for these too. Maybe to hold tea light candles on the deck. Flower vases. Fun  glasses to sip iced tea. 

 I got all 13 pieces of glassware for $7.49. My lucky day!

Tuesday, June 5, 2012

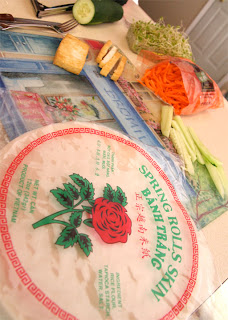
Baked Tofu Summer Rolls

I tried a new recipe that I found via Lauren Conrad's website. I've never even watched The Hills, but Lauren has some fitness plans and meal suggestions. The recipe for Baked Tofu Summer Rolls comes from the food blog Hazelnut. I learned how to make spring (or summer) rolls at a class at work. This was my first time trying them at home. They were so fresh, delicious and healthy! I used baked tofu, but you could swap chicken or use all veggies if you like. The dipping sauce definitely makes it, so don't skip it!

Ingredients for rolls:

2 large rice paper wrappers
1 cup baked tofu (slice one block of well-drained tofu into 5 rectangles, place on foil lined baking sheet and bake at 350 degrees for 40 minutes, flipping half way through. Cut into strips.)
1 cucumber, cut into thin spears
1 cup bean sprouts
 1/2 cup shaved carrots

Directions:
  1. Using two hands, run the rice papers under running warm water, one at a time, until pliable.
  2. Lay rice paper on cutting board and fill with 1/2 of ingredients. 
  3. Fold paper in at ends, then one side, and finish by rolling (like a burrito). 
  4. Cut diagonally and enjoy with dipping sauce!
Ingredients for dipping sauce: 

2 tablespoons honey
1 tablespoon rice wine vinegar
1/2 teaspoon Sriracha hot sauce (or any hot sauce)
dash of red pepper flakes

Directions:
  1. Whisk together all ingredients with a fork.
I like to layer bean sprouts first, followed by cucumbers, then tofu, then carrots. If you want to add an extra burst of flavor, add some torn basil or mint. I made a few rolls ahead to take for lunch. Delicious

Monday, June 4, 2012

Dos Loco Gatos

Besides my husband, I live with two crazy cats. Two is the most we will ever have at any one time (I think three or more qualifies as "cat lady" status). I like having them around. Even though they're hairy, sit on every piece of furniture we have, conduct crazy wrestling matches in the middle of the night, and can get on our nerves at times, they bring a lot of simple joy to our lives. Those of you with cats (or dogs) know what I mean.


It's nice to have a furry friend greet you when you come home. There's something about a purring cat that's almost therapeutic, especially when they cuddle up with you on a chilly day. 


Regardless of what cat-haters people say, they really have unique personalities. When you find a good one (or two), they become great pets, part of the family. 


I'd say we lucked out with two good ones (for the most part). We got Lacey 6 years ago from a local animal shelter when she was a kitten. She tends to keep to herself and isn't that outwardly friendly. Lacey's more of a scaredy cat and takes a long time to warm up to people. She's definitely a "girl" with her sporadic mood swings. But we love her because she was our first pet, we picked her out together and brought her home to our first apartment. 


Chancho is our Mexican orphan. His name is from Nacho Libre. We found him on Craigslist 3 years ago, after my co-worker adopted his brother, Bruno. He was the last kitten left, and we literally picked him up at a parking lot. Poor little guy needed some TLC. He was sooooo cute with long soft fur. I've always wanted a gray and white kitty. Little did I know he would be ca-razy. His sweet overly affectionate personality makes up for his bad behavior. Chancho is more like a dog - his favorite thing is playing fetch.


When they're not fighting each other or doing things they shouldn't, they can usually be found in this position. Ah, the life of a cat.