I'm excited to finally share my new tiny office reveal! This under-the-stairs walk in closet measures about 3 feet wide by 12 feet long, with the staircase taking up a lot of the vertical space. I think most people thought I was crazy for trying to turn this into a working office. But with some careful planning, small furniture, creative storage pieces and a LOT of my husband's hard work (a TON of work), we somehow made this little tiny office dream of mine a reality. I'm giddy just typing this in this very space!


When I look at the before pictures, and remember what this used to be, I only have two words: HOT MESS. Since we've lived here, this closet was a mishmash of storage space for craft supplies, books, paper products, clothing and whatever stuff we didn't have room for somewhere else. It was bad. Real bad. The actual structure of the closet was a disaster. There was a giant heating and cooling vent weaving through the floor. There was asbestos tile and patches of floor that were missing. An oddly positioned wood beam that served no purpose. A few unfinished sections of drywall and decomposing ceiling. It was not pretty to say the least, but it did hold a lot of stuff.


When we decided to move Marshall into my former office, I kept trying to figure out the best place to relocate the large work desk that we built, my computer, office supplies, and other things that I really wanted to still have access to. My mind would not rest until one day it dawned on me that maybe this closet could be transformed into just enough space for me. I ran it by my husband probably enough times to wear him down until he finally (reluctantly) agreed. I married a patient and very loving man. That's an understatement right there. None of this could have happened without him. I need to sing his praises because he worked many nights and weekends, cutting and installing countless boards and flooring, painting, painting and painting some more. We hired professionals to reroute the vent and update the electrical (which was the biggest investment), but the rest was all him.


We searched high and low for the right boards that would create that shiplap look (channeling my inner Joanna Gaines) and finally landed on new wooden fence posts. We considered leaving them their natural color but I really wanted the room to be all white, including the stairs, which was probably the worst part to paint.
How great does that look?!? We picked out inexpensive laminate flooring to match the rest of the downstairs. I really like the contrast. It started to look like a real room! If only there were 3-6 more feet of space...
This closet actually has two doors, one from Marshall's room (it truly is a closet) and one leading to the rest of the house. It's kind of fun to be able to go through to both sides. This may sound silly, but I've always wanted my own little "place under the stairs".
I could not WAIT to move my things in and figure out how everything would fit best. Marshall put the new desk to the test, which was actually a very narrow console table we had in the living room. Anything wider would not have fit, and anything smaller would not have supported my (large) computer.
I also had a small filing box on a metal stand that was perfect for extra desk space and to store my printer underneath. I stacked my white storage boxes and some baskets under the stairs.
I really hoped to be able to fit a small chair and side table to sit and read or have an occasional visitor. I picked up this adorable white chair at a local charity garage sale for $8. I created a small bookshelf-table by stacking two wooden crates from the craft store. Andrew made the floating shelf above for my jars of art supplies. The metal baskets used to be in another room and were from Hobby Lobby. Isn't it cute? I occasionally sip cup of tea in this spot while enjoying a few quiet moments in the morning.
A wreath and some prints hanging on the wall, along with a metal letter organizer and one of my burlap cork boards cozy up the space. I didn't want it to feel cluttered, just a few pieces that make me happy to adorn the walls.
I'm sure I'm forgetting some details, but I'm just so thrilled that it's done and that it turned out waaaaay better than I even imagined. My growing baby belly is still able to fit behind the desk! I've been pregnant throughout this entire makeover, so I'm curious to see how much "roomier" it will feel once baby arrives.
Even though there were quite a few times I thought about giving up and got really discouraged with this project, I kept picturing what it could be like. I'm so glad Andrew was willing to work so hard to make it come to life. Don't let anyone talk you out of your dreams! It may take some time (or a lot of time) and there may be setbacks, but keep looking for new ideas and solutions. It will be worth it!
Since becoming a work at home mom (yay!), having a dedicated work space and home office is vital. Earlier this year, after my son was born, I left my full-time job (which I loved) to be a stay at home mom (which I really love even more). Now, I am a freelance graphic designer and art director. For me, it's the best of both worlds.
Almost two years ago, I did a complete home office makeover. Including building a custom desk, reupholstering my office chair, painting a chandelier, making burlap message boards, and other fun DIY projects. My combination office/craft room/reading and relaxation spot is one of my favorite rooms in our home. A few things have changed, but much has remained the same. Here is a tour of my work space and a few must-haves that I included in the design.
A LARGE DESK
My biggest must-have was a large desk with ample work space. Enough to accommodate two computers, a sewing machine, tools and still have room to work. My husband and I built a custom desk that spans the length of the room. It's awesome! Believe it or not, sometimes I still wish it were larger. I tend to make a mess when I get creative and there never seems to be a shortage of papers, folders and miscellaneous items.
STORAGE
Another must-have was plenty of storage. We used deep cabinets from IKEA as the base of our desk. We also brought in a large storage hutch from another room to keep craft supplies. Everything has a place and can be stowed out of sight!
A COMFORTABLE CHAIR
In addition to my desk chair, I wanted a place where I could sit and read, journal, sketch and just relax. This comfy chair and little side table is one of my favorite places to sit with a cup of tea and recharge.
GOOD LIGHTING
One of my most favorite elements of this room is the chandelier I spray-painted bright red! It definitely lights up the whole space and makes me happy. No more boring crappy lighting. I also bought a pretty little mercury glass lamp for my side table, which casts a warm glow in the evening. Proper lighting can make or break a room. Especially when you're trying to work.
INSPIRATIONAL ITEMS
If you spend a lot of time in a room, you should surround yourself with things that inspire you and make you happy. I have all types of items in my work space that make me smile. Milk glass vessels, antique cameras, jars of buttons, ribbons and supplies, photos of family and friends, cards and keepsakes, inspirational quotes. Being surrounded by pretty things makes me enjoy working and crafting (and even paying bills).
Your space doesn't have to be huge and it doesn't have to be perfect. It just has to be someplace you like to be and can accomplish what you need to get done. Functional as well as fun. As simple or as fancy as you like. As long as the basics are there - a desk, chair, (electricity if you need to be plugged in), paper, pens, etc. Maybe sunlight and fresh air are all you need some days. A change of scenery. A coffee shop. A bench at the park.
If you don't have your own work space or would like to network and connect with others, WeWork offers shared office locations around the globe. They also offer discounts and benefits to their members. If you run your own business, or you're a freelancer like me, sometimes a professional office space is beneficial. To learn more, visit WeWork.com. I have not had the opportunity to use one of their office spaces yet, but I definitely plan on keeping them in mind.
I embellished the white hutch that now sits in my office with gray and white chevron contact paper.
I've been seeing stylish rolls of contact paper at places like Marhshall's and TJ Maxx. When I saw a gray and white chevron pattern, I had to get it and knew I would find a use for it.
This is the hutch we painted white a while ago. It has inlaid squares on the doors, and aways made me think it needed a little something extra.
It used to sit in our living room.
Before we gave it a full makeover, it used to be green with light wood.
I simply measured and cut squares for each section of the door, removed the adhesive backing and stuck them on. Instant style and character!
It adds a modern touch to an otherwise classic looking piece of furniture. Don't you think? Contact paper is handy for a variety of projects. It would be great to add to the back of a bookcase or - call me crazy - you could use it in a closet, powder room or small space as "wallpaper" on an accent wall. How cool would that be?
Have you seen those adorable burlap bulletin boards, memo boards, shadow boxes - and anything else you can think of, covered with burlap? There's all kinds of accent pieces in stores featuring burlap fabric. I am a big fan of that stuff. But, sometimes I see something and think, "I could make that." So, I decided to actually try it.
I saw this board in TJ Maxx for around $20 and a larger one behind it for around $40. It's essentially just a board, burlap and decorative nail head trim. I knew I could DIY something similar.
On my trip to IKEA, I spotted these 22x15 inch plain wood framed cork boards for $5.99. Jackpot! I got two, because I thought a pair, side by side, would look nice in my office.
I already had a large piece of burlap fabric, leftover from another project. I picked up 3 packages of furniture nails from Lowes for $1.30 each.
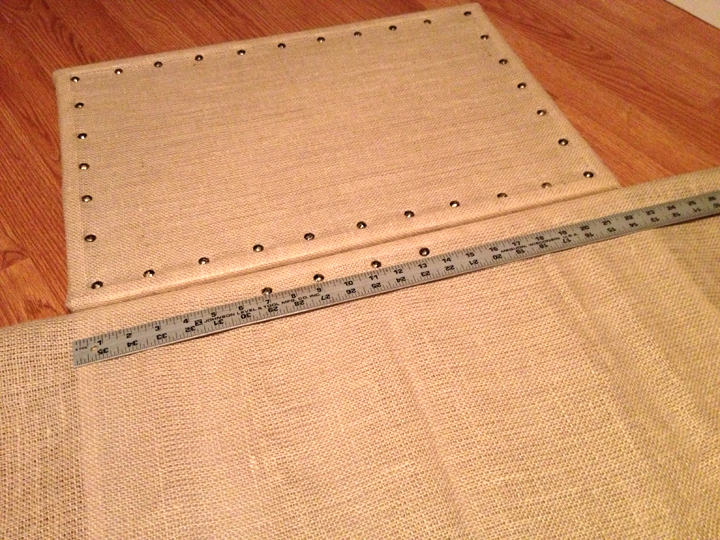
I measured and cut the burlap, large enough to wrap around each board generously.
I wrapped it up like a present, using duct tape to keep in in place, while I secured the nails to the front. I later removed the duct tape, once the nails were secure, and used a staple gun (with small staples) to keep the fabric tight and finish the back (sorry, no picture of that part). I tried my best to make neat corner edges.
While the burlap was taped down on the back, I turned the board over to add the nails. I started in the center, using the wood frame as a guide, and placed the nails about 2 inches apart. I made sure to space them evenly and adjusted as needed. I wanted both boards to look identical, so when one was done, I used it as a guide for the second board.
Having the wood frame actually made it quite easy because I lined them all up along it's edge. Once the nail head trim was in place, I removed the duct tape (or you could leave it as it) and stapled the burlap in place tightly, finishing the corners.
I really love how they turned out! Aren't they cute? You can customize any size cork board. Large nail head trim would be really fun. I've even seen burlap with different patterns, typography and prints.
I love a good before and after. A pretty easy project to turn an ordinary cork board into one with natural-chic charm.
These Burlap Message Boards from Ballard Designs (a great site) start at $29 (small), $59 (medium) and $149 (large). It cost me about $16 to make two medium size boards (plus the cost of burlap, which I already had). Talk about a bargain!
Here's a couple more inspiring burlap frames that would be super cute and easy to make. Paint the fame a fun color and swap out the glass for some padded or cork backed burlap. I may need to try this one too!
I can't wait to use them in my new office!
Supplies:
Cork board
Burlap fabric
Nail head trim or furniture nails
Duct tape
Staple gun with small staples
Ruler