Monday, September 2, 2013

DIY Burlap Message Board

Have you seen those adorable burlap bulletin boards, memo boards, shadow boxes - and anything else you can think of, covered with burlap? There's all kinds of accent pieces in stores featuring burlap fabric. I am a big fan of that stuff. But, sometimes I see something and think, "I could make that." So, I decided to actually try it. 

I saw this board in TJ Maxx for around $20 and a larger one behind it for around $40. It's  essentially just a board, burlap and decorative nail head trim. I knew I could DIY something similar.

On my trip to IKEA, I spotted these 22x15 inch plain wood framed cork boards for $5.99. Jackpot! I got two, because I thought a pair, side by side, would look nice in my office. 

I already had a large piece of burlap fabric, leftover from another project. I picked up 3 packages of furniture nails from Lowes for $1.30 each. 

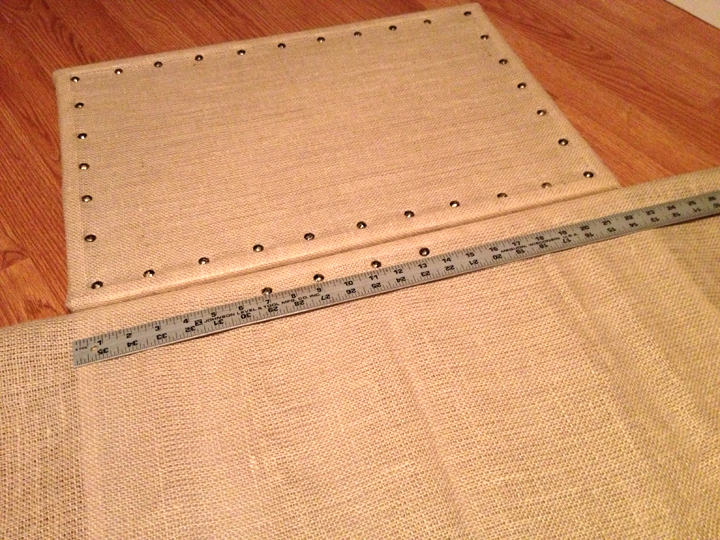
I measured and cut the burlap, large enough to wrap around each board generously. 

I wrapped it up like a present, using duct tape to keep in in place, while I secured the nails to the front. I later removed the duct tape, once the nails were secure, and used a staple gun (with small staples) to keep the fabric tight and finish the back (sorry, no picture of that part). I tried my best to make neat corner edges.

While the burlap was taped down on the back, I turned the board over to add the nails. I started in the center, using the wood frame as a guide, and placed the nails about 2 inches apart. I made sure to space them evenly and adjusted as needed. I wanted both boards to look identical, so when one was done, I used it as a guide for the second board. 

Having the wood frame actually made it quite easy because I lined them all up along it's edge. Once the nail head trim was in place, I removed the duct tape (or you could leave it as it) and stapled the burlap in place tightly, finishing the corners. 

I really love how they turned out! Aren't they cute? You can customize any size cork board. Large nail head trim would be really fun. I've even seen burlap with different patterns, typography and prints. 

I love a good before and after. A pretty easy project to turn an ordinary cork board into one with natural-chic charm. 

These Burlap Message Boards from Ballard Designs (a great site) start at $29 (small), $59 (medium) and $149 (large). It cost me about $16 to make two medium size boards (plus the cost of burlap, which I already had). Talk about a bargain! 

Here's a couple more inspiring burlap frames that would be super cute and easy to make. Paint the fame a fun color and swap out the glass for some padded or cork backed burlap. I may need to try this one too! 

I can't wait to use them in my new office!  

Supplies:
Cork board
Burlap fabric
Nail head trim or furniture nails
Duct tape
Staple gun with small staples  
Ruler

Summer Fun

Somehow, it's September. I don't know about you, but I feel like I blinked and summer came and went! How can the 3 "best" months of the year be over? 

In August, we took a long weekend trip to Pennsylvania to spend time with our family. We enjoyed visiting, sitting outside (we had beautiful weather!), took a trip to IKEA (yes!!!), spent a day at the beach, and even had time for golf. I didn't take a ton of photos, partly because we were too busy enjoying ourselves and partly because certain people don't like their picture taken (you know who you are).

My niece, Syndey, just turned 8! She's looking more and more grown up, each time I see her. She is very sweet, helpful, creative and has a great sense of humor.

I asked Morgan to show me her "excited" face when we got to IKEA. I think my face looked much the same. I was pretty excited. Morgan is such a sweetie who loves to cuddle - along with being very independent and a bundle of giggles.

On the red carpet, after an afternoon of shopping. I could have spent a few more hours wandering around that Swedish wonderland. 

A relaxing, sunny day at the beach. Just what I needed.

Toes in the sand and umbrellas as far as the eye could see. 

 Of course, a little football. That hunk winding up for a throw is all mine! 

On our last day, while the guys were out on the "real" links, the girls played some mini golf. 

I'm probably the last person that should be teaching anyone how to golf! Morgan was a very good student and did really well! She looked too cute swinging that tiny club. 

Sydney and I played the last hole together and somehow got a hole in one - against impossible odds! I still don't know how. It was very exciting. The bell sounded and she won a free round of golf! 

I wish I could go back to that spot on the beach. So beautiful and relaxing! Ah, summer, I miss you already. Don't leave too quickly, ok? Maybe you can linger until late October...

Tuesday, August 27, 2013

DIY Gold Sunburst Mirror


This was supposed to be a project for my new office, but it ended up finding a home in my living room. It was a much larger scale than I anticipated but I love how it turned out. 

I was instantly inspired by this DIY mirror project by The Lettered Cottage. Thank you Christy for pinning it! I already had the circle mirror and it looked like something I could make. 

I picked up a bunch of .59 cent wood dowels from Hobby Lobby and cut them into 3 different lengths with this little hand saw. It was not the easiest way to cut them, but it worked!

I roughly configured the ray pattern while my hot glue gun heated up.

I drew a crosshatch on the back of the mirror to locate the top, bottom, left and right center points. This provided a reference for symmetry. Symmetry! 

Then I worked, very s-l-o-w-l-y to glue each dowel on, one by one. It. Took. A. Long. Time. I will say this, when it comes to gluing these on, less glue is more. The ones that I gobbed glue on and slathered both sides, were the ones that fell off and needed repair. About 5 of those little lessons learned. Thankfully, the glue dried quickly, and once it was set, they were good to go.

Once they were all in place, I  spray painted the entire thing with gold metallic spray paint. I removed the backing and the mirror, which made it even easier to paint. A few coats later and it looked great! 

My new mirror really pops against the gray wall in our living room. It makes quite a statement above our console table! I really like it. The cork mirror was relocated to the kitchen (in case you were wondering). It looks even better sitting on a red wall.

This antiqued metal gold mirror retails for $355. Yowza. Mine cost $16. Granted, this one is metal and has a lot more rays and detailing than mine. But gluing on that many dowels? Ain't nobody got time for that! 

If you're looking for a DIY wall art project that will add impact to any space, without a huge price tag, this mirror fits the bill. It would be fun in any color!

Supplies:
Round mirror
Wood dowels
hot glue
gold spray paint
 

Sunday, August 25, 2013

Home Office Makeover

My office/craft room is currently undergoing a full makeover. I've been dreaming up a couple DIY projects and pinning inspiration. But, as per usual, it's been a little slow going. I definitely have the "vision" and pieces are starting to take shape.

We already painted the walls, which made a dramatic difference (as you can see above). No more teal! The new color is "revere pewter" a taupe/tan with a twinge of gray undertone. Here's a look at the old wall color. Just not my taste anymore.


Next on the list is replacing the carpet (which is quite old, worn and an odd color). I can't wait for that! 

I also hope to "build" a long desk with two cabinets for storage, inspired by this Young House Love DIY project. There will be enough space for my computer, printer, sewing machine and supplies, all in one work station  (instead of having 3 different desks/tables like I currently have).

There is work to be done, but I'm very excited about this office makeover. The chaos and lack of organization while I'm in "office limbo" is driving me a little crazy. I can't wait until everything has it's place and I can craft and design to my hearts content! I'll be tackling a few smaller office projects in the meantime, so stay tuned. 

Sunday, August 18, 2013

Gratitude Check

This is one of my favorite spots at a nearby park. Today, I sat here looking out at the still water, pondering life, as I have many times. I was thinking about gratitude (or my lack thereof). Our church has been teaching a miniseries about contentment. Learning to be thankful for what we have, in whatever state we're in. That means being content wherever you are in life right now, poor or rich, employed or unemployed, married or single, in a house or in an apartment, successful or unsuccessful.

Contentment isn't always easy for me. I'm usually looking ahead to the "next thing." Once I reach an accomplishment or gain what I was after, it's great for a while, but then I wonder, what's next?

With social media - Facebook, Instagram, Pinterest - it's easier than ever to look at other people and think, why don't I have that house/job/talent/family/_________? Pretty soon we start comparing our lives and in creeps discontentment. 

In Philippians 4:11-13, Paul (in prison) talks about learning to be content: "Not that I speak in respect of want: for I have learned, in whatsoever state I am, therewith to be content. I know both how to be abased, and I know how to abound: every where and in all things I am instructed both to be full and to be hungry, both to abound and to suffer need. I can do all things through Christ which strengtheneth me." 

I got a speeding ticket this weekend. Yes, that's right. The only other speeding ticket I ever got was over 6 years ago. Once I got over the annoyance that I got a ticket (even though I was going faster than I should have been), it made me think. What's the point of a speeding ticket? To remind you to drive slower and follow the speed limit. Why? Because it's ultimately for your safety, and the safety of others. It was a tangible (and expensive) reminder to me to S-L-O-W down. Both on the road and in life. 

If I keep wishing away the here and now, speeding ahead to the "next thing", I'll miss the wonderful life that's right in front of me. I'm guilty of falling into the trap of thinking "if I only had this or that, I'd be happy". Not so. Learning to be satisfied and content with what God has already abundantly blessed me with is the key. And I needed to be reminded of that. 

I like what Liz wrote about the Ugly Side of Comparison. Following her lead, I'm going to share a brief gratitude list of my own. I encourage you to make your own list too! 

First and foremost, I have a relationship with my Heavenly Father, Jesus Christ, and the unmatchable, undeserved gift of salvation and eternal life. Thank you Lord! 

I have a husband who loves me unconditionally, treats me like a queen and makes me laugh. 8 years of marriage later, and he still looks at me the same way with those amazing blue eyes, even though I don't deserve him. 

I have a pretty sweet job, doing what I went to college for - and it pays the bills. 

We live in a house that we picked out together and continue to make our own.

I have very good credit. 

I have two cats that like to sit on my lap, snuggle and greet me whenever I come home. It makes cleaning up after them worth it (for the most part).

I live in the United States of America.

I have good health, the ability to travel and enjoy life on a daily basis. 

I have a variety of hobbies and talents that I enjoy. 

I am a fashionista and I have good hair (most days). 

I have friends and family. 
 
This is by no means an extensive list, or intended to come across as "bragging". I think it's good to take a close look at what we have to be thankful for on a regular basis. I call this my gratitude check. Feel free to do the same. God is good. All the time. 

Monday, August 12, 2013

Peanut Butter Banana Coconut Chocolate Chip Oat Bars

I made my own soft oat bars for the first time. I tried to keep them on the healthier side, based on this recipe. Making them was very simple and I actually had all of the ingredients already. You can add whatever type of nuts or add-on's that you like. I usually keep a few store bought bars on hand for a snack or even breakfast, but at $1+ a pop, making them at home costs much less. They aren't as sweet, because there's no added sugar (which is kind of the point). Give them a try. I've already had two today, and I'd like a third! 

Ingredients:
2 ripe bananas
1/2 cup peanut butter (I used Organic, unsweetened)
1/2 cup unsalted peanuts
1/4 cup shredded coconut (plus extra to sprinkle on top)
1/2 cup mini chocolate chips
1 tsp vanilla
1/2 tsp cinnamon
1/4 tsp salt
1 cup of old fashioned oats

Directions:
Preheat your oven to 350
1. Mash the bananas in a bowl. Stir in the rest of ingredients and combine well.
2. Line an 8 x 8 pan with parchment paper (it helps to grease the pan a bit to get the parchment to stick to it.) Then spread the batter into an even layer with a spatula.
3. Bake for 20 - 25 minutes until the edges are golden brown.
4. Allow to cool completely before cutting into slices.

Sunday, August 11, 2013

Tricia's Personal Shopping Service Logo

My friend, Tricia, is in the process of starting her own personal shopping service business. Doesn't that sound like fun? That girl loves to shop! She asked me to design a logo and promotional materials to get her started. I was excited to help! Tricia offers grocery, gifts, lottery, wine and other retail shopping - so you don't have to. Just give her a call or send her an email and have them delivered right to you. What a great business idea.
We came up with a logo that reflects the variety of retail services as well as Tricia's fun and girly personality.

I really like how they turned out. I'm excited for Tricia and her new business. If you live in the area and could use her services, please contact her. I know she would love to shop for you!