Showing posts with label home decor. Show all posts

Friday, February 24, 2017

Suffering Succulents


Who doesn't love succulents? Maybe you call them "hens and chickens". Either way, these adorable green drought-resistant plants with rubbery leaves, in variety of shapes and sizes, have been all the rage for quite a while. I've been trying to keep some alive, indoors and outside, for years. 


Here's my latest indoor loss. This cute succulent from West Elm only lasted in my house about a year. Rest in peace. I never know if I water them too much or not enough! This is probably the third one I've managed to kill. Enough is enough. 

I started looking for inexpensive fake succulent alternatives. They can be a little pricey, depending on the size and container. Plus, I don't want them to look super-fake.  


I discovered single succulent pick stems at Walmart for just $1.99. It was the perfect size for the mercury glass vessel from my recently deceased plant.


I found a vase of sand lying around in my basement (because who doesn't have perfectly good sand lying around? This is why I never throw things out!). I used it to fill the container. 


And I stuck the succulent pick inside. Done! My own little DIY greenery for cheap. 


It's adds a little life in an otherwise dull area. 


THEN I found these little fake succulent containers at Target for just $3! THREE DOLLARS. There were a couple styles left, but I grabbed this one because it was different than the one I made. I think they are selling out fast.


I've seen similar styles for $8-15 and up. If you're looking for some adorable plants that you won't kill, to spruce up your decor, you can make your own or run to Target, ASAP. You can use any small container that you have - milk glass, mini flower pots, glass, mason jars, bowls. You could even get a small bouquet of individual pics and make a little garden or terrarium. Happy (fake) gardening!

Thursday, October 6, 2016

5 Simple Ways to Add Fall Style to Your Home

When it comes to seasonal home decor, I usually don't change too much, but I really like the feeling of cozying things up when the weather starts getting cooler. How perfect does relaxing on your sofa with a nice blanket and a good movie sound right now?

Here are five simple ways that you can incorporate fall style into your home and enjoy autumn, indoors. 

1. New statement piece
Maybe you've had your eye on a gorgeous metallic mirror, clock or other piece of wall art. A new statement piece can easily change up the feel of any room. It doesn't have to be expensive, either. You can DIY an existing piece with gold spray paint or score a vintage find at a second hand store. 

2. Throw blanket
Who doesn't love snuggling up with a warm blanket in your favorite chair? I can never seem to have enough throw blankets. Pick one up in a warm burnt orange hue, mocha or neutral gray. Maybe even get two so you don't have to share! 

3. Accent pillows
Pillows are one of the quickest and simplest ways to change up the furniture in a living room. You can go a little outside of your comfort zone and select a seasonal color palette or bold patterns. I really like the pillows I've been seeing in stores with words like "thankful", "grateful", and cute quotes. They help personalize a space and add some fun. 

4. Candles 
I don't think I'll ever get tired of candles. They add so much light, warmth, and delicious aromas. I like using tealights on different surfaces, especially in versatile votive holders, like mercury glass. So pretty! When it comes to making my house smell amazing, I'm a sucker for those powerhouse 3-wick candles from you-know-where. "Leaves" is one of my very favorite scents. Along with anything apple, pumpkin or caramel. 

5. Bring nature indoors
Pumpkins are the obvious choice for decorating the exterior of your home, but there's a lot of other elements in nature that you can decorate with, inside - right from your own backyard! Pine cones, acorns, leaves, sticks, corn kernels. I like to fill glass vases with pine cones and acorns and surrounded them with a few tealights to make beautiful centerpieces. 

What are some ways that you like to decorate for the fall season? 

Friday, March 11, 2016

Smooth Ceiling Renovation Part 2: During


The hardest part of any major renovation is the "during" stage. This one was definitely a HUGE challenge for us. It probably would have been a better idea for us to not be living here while the work was in progress, but we managed to be out of the house during the day and make due by living out of our office and upstairs bedrooms in the evenings. However. The. Dust. All. The. Dust. I'm still finding areas that I know I've cleaned, multiple times, but the dust is still settling, months later. 

Basically, we had to move everything out of our house (downstairs) as if we were moving out. But we weren't moving. We considered renting a POD, but the cost outweighed the benefit for us. Somehow, all of our stuff went into the basement, garage, bedrooms, and where ever we could find a place for it. "Moving out" only to move back in was pretty annoying, I gotta be honest.  


Then, it was demo day. I didn't even take photos of the worst of it. There was plastic covering the windows and doors and a layer of dust and debris literally everywhere we stepped. The goal was to quickly get in and get out of the house each day. 

As you can see, the old ceiling has been removed, exposing the wood beams and old insulation. One major benefit was replacing the insulation and adding new insulation where it was lacking. Oh. And there was a dead bees nest in our kitchen. That was FOUR FEET LONG. So. Yeah. I'm glad I wasn't there to see that! I'm praying the bees don't somehow find their way back in.


Our skylight has always been a great source of natural light in our otherwise dark living area. But when it was all opened up, it was evident how "wonky" it was, not framed symmetrically or correctly. We decided to have it re-framed, creating straighter lines, and actually taking up less surface area in the ceiling.


At last! New drywall going up. The rooms started to take shape again. Just the sight of this was enough to give me faith that it would all be worth it.  


There was a LOT of mud and a TON of sanding that needed to take place. And then more mud. And more sanding. There were areas of our ceiling that were sloped and had difficult seams. But Jesse did a really great job blending everything as much as possible and making it as smooth as it could be.


And then new lighting. Oh, sweet, glorious lighting! I've never been so excited about lighting in my entire life. Andrew and I were both thrilled about this part. Here's a sneak peak at our LED recessed lighting and my new kitchen fixture. Isn't it pretty? 

That's a much condensed look at the work in progress. I assure you, it wasn't this neat and tidy until it got toward the end of the two weeks. Andrew and I both did our share of sweeping, dusting, and scrubbing the floors on our hands and knees. He also worked into the night, many nights, to paint, re-paint and touch up all of the walls. Once again, he is my painting hero! It's amazing we're still married after all the painting I've made him he's done in our home. 

Stay tuned for the big reveal!

Monday, August 17, 2015

Mini Coffee Station


If there's one thing that will always be a staple in our kitchen, it's a coffee maker. My husband is an avid coffee drinker and he has been since the day we met. Morning, noon or night, he's almost always up for a cup (or two or three). 


I've seen many different types of coffee stations or coffee bars all over Pinterest. I was especially inspired by Katie Bower's desk turned coffee bar. Our kitchen isn't big enough to dedicate much counter space to making a true "station", or add a large piece of furniture, so I kept thinking of other ways to create something on a smaller scale.  


I've had this wooden wine rack in our living room for a few years. It feels like a tall end table. It's been serving as a wine-magazine-candle rack for quite a while. I wondered if it might just work as a mini coffee station. 


It's one of the first things you see when you walk into our house and is snugged right behind our kitchen table next to a bench. Anything bigger would be too much. 


I really wanted to incorporate shelving above to keep mugs and a sugar bowl. The shelves were already there, so all I had to do was re-style them. All you need is some type of stand - it could be an old dresser, hutch, desk, island, table, shelving unit, anything! Add your coffee maker and a basket or tray with supplies - coffee (of course!), filters, stir sticks, whatever you like. And lastly, some pretty mugs, sugar, and other fixin's. That's it! Cute, right?


Make sure you have something underneath your coffee maker if it's a wooden surface or something you'd rather not get wet. I used a round place mat. Andrew's favorite coffee is Wawa hazelnut. He buys some every time we go to Pennsylvania to keep his supply stocked.


I can also store my cookbooks and still use it for wine bottles. A perfect little multipurpose stand! I bought this inexpensive wine rack at Big Lots years ago. Check out the miscellaneous furniture section at similar stores for little gems like this. 

Cheers and happy coffee drinking!

Friday, August 14, 2015

White to Bright Style Challenge


Chairish, an online marketplace for buying and selling vintage furniture, invited me to participate in their White to Bright style challenge. The goal is to design a mix styles room, with a color scheme based around an accent chair. If you know me, you know that I like vintage furniture and I love styling rooms and picking out home decor. My kind of fun!


I selected to use their Bergere chairs with orange upholstery. Aren't they pretty? Great lines! As soon as I saw them, I knew they were the ones I wanted to design a room around. Since I have a tangerine wing back chair in my living room, that also happens to be a vintage find, I was all the more inspired. I'm not afraid of color and mixing old and new styles.  

I learned two cool things while designing this room. First, I discovered what Chairish is. It's such a great site for buying, selling and browsing. I could look around all day! So many unique pieces. And not just furniture, but lighting, art, rugs, small decor and more. What a wonderful way to be inspired - and keep your eye out for diamonds in the rough at garage sales and flea markets. Shop for Chairish accent chairs here.

Secondly, I discovered Polyvore. Am I the last one to know about this? It's got style boards, fashion, home decor, and trends galore. Seriously. Why didn't I know about this? You can make your own boards and pick and choose from hundreds and hundreds of images. It's a collage makers dream come true! If you're looking for a specific item, such as a blue ottoman, you can run a search and find every blue ottoman that's out there. Uh. Maze. Zing. When I was a little girl, I literally used to cut pictures of furniture out of magazines and glue them to paper to decorate pretend rooms. I was so ahead of my time!


Here is the room I created, based on the pair of orange Bergere chairs. I designed it in Photoshop (because I use it all the time and found it to be more flexible for me), but if you don't have Photoshop, Polyvore is your new BFF. 

What goes with orange? I chose navy blue and gray with gold accents. I'm still a fan of light gray walls. It's a wonderful neutral that almost any color can work with. The dark gray floor length curtains create a nice backdrop for the room. The orange chairs really hold their own, so I chose complimentary pieces that helped them stand out, yet look like they all belong together. I like how the gold lamp, mirror and chandelier add shine and sophistication, but aren't too fancy or ornate. The navy blue love seat pulls everything together and helps anchor the room. The blue and white ottoman plays off the love seat and adds another layer of texture and pattern. The rug also introduces a subtle pattern, with a warm straw color that works with everything and looks great against the wood flooring. 

I don't know about you, but I would like to live in this space! It feels modern with a vintage flair, yet looks comfortable and approachable. I'd say this room is definitely not boring white, but cheerful and bright! 

Thank you, Chairish for the opportunity to create a fun room! I hope you'll be as inspired as I was.


Sunday, January 4, 2015

Baby Boy's Room


I had so much fun dreaming up and decorating our baby boy's room. I couldn't have done it without my DIY partner, that's for sure. It was put together with lots of love by both Andrew and I. He is my expert painter, shelf hanger, furniture assembler, window blind installer and more. I am truly thankful for that! 

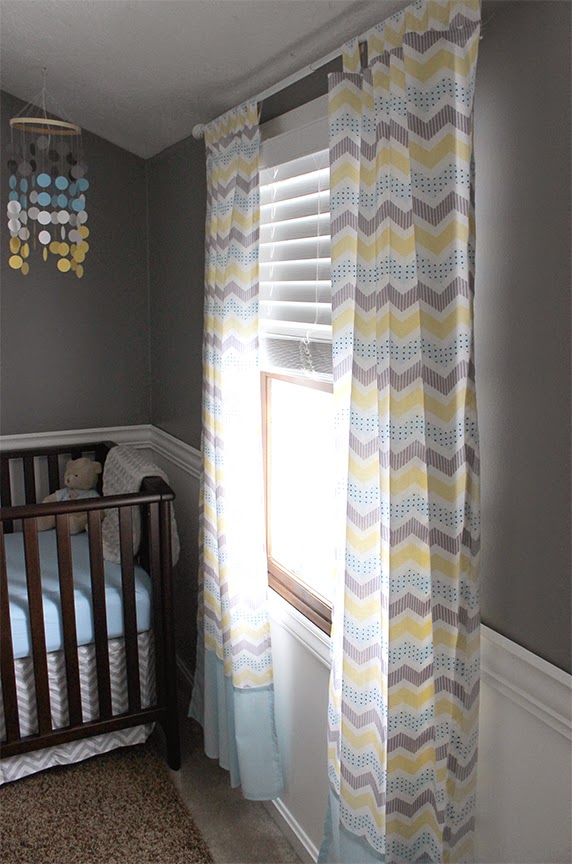
My vision was to create a tranquil room with a gray and white base, and incorporate pale yellow and light blue accent colors. I am still a fan of gray and white chevron and found pieces I could use to tie it all together (but not go overboard). 


The fabric I used to make tab-top window curtains started the ball rolling with the overall theme. It has the colors I wanted in a chevron and small polka-dot pattern (Jo-Ann Fabrics). Not too babyish, yet still boyish. I knew I didn't want a character themed room or one of those bedroom-in-a-bag sets. Just color and pattern with a simple, cozy customized feel. The colors and curtains can easily be swapped out.


I used the same color palette to sew a paper mobile, inspired by this one. The strings were definitely a challenge, but I love how it turned out! Very inexpensive, too. 


One of the dressers I grew up with will act as the changing table. Above the dresser, we hung a mirror we already had and added metal baskets for extra storage (from Hobby Lobby). We are so blessed to have many hand-me-downs and baby items to use and borrow from friends and family, such as the changing pad and diaper genie. 


Isn't this rocking elephant just the cutest thing (Pottery Barn)? He was a surprise gift from my Aunt and cousins. I can't wait for our little guy to use it! 


We added a pair of simple white shelves from IKEA. Baby Ohl will most definitely be an Eagles fan like his Dad, so of course he needed an Eagles piggy bank!


Beneath the shelves is a small bookcase that my husband made in high school shop class. He cleaned it up and painted it white. Now it houses all the wonderful books we received that I can't wait to read at bedtime. I love how special this piece is. 


Some buddies and blankies, waiting to be friends.


We decided to keep the daybed in the room, which I'm sure will be frequently used for naps and nighttime feedings. When he's ready to graduate from his crib, he'll already have a bed. And it can still double as a guest room when needed.

I put together some wall art (most of which was found or inspired by Pinterest). The magnetic alphabet letters will be fun to play with. I'm sure Nana will like the deer head. The snail and mushroom print was a gift to remember my coworker, Karen. She was such a talented artist, who passed away from cancer last year. I think she would be happy to know that it hangs on our nursery wall.


Another hand-me-down that I'm especially grateful for is this glider rocker and ottoman. I know I'll be spending many hours here, rocking our sweet baby. 


I can hardly believe that he'll be wearing tiny little adorable things like this! I have to admit, I'm looking forward to dressing him up in all the cute clothes we received. 


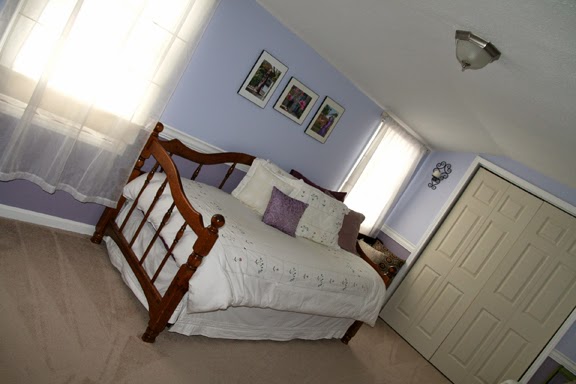
This is a look back at our former guest room which was lavender and periwinkle.


The walls are now gray and white, we have more than enough to care for him and the room is ready to welcome our baby boy. I hope he likes it as much as we do.

Our hearts and our home are ready for you, sweet boy. We can't wait to meet you!

Wednesday, August 20, 2014

Nightstand Makeover


Hello friends! I am a bit behind on sharing a few recent projects that have to do with our bedroom makeover. One of which, I was pretty excited about. This pair of mismatched nightstands. I found the white one on the side of the road (trash night), therefore it was *FREE*. It was in rough condition but the shape was so pretty. It just needed some love! I found the wood one, of similar size and style, at the flea market last summer for three dollars. $3! 


They both sat, untouched for over a year until I decided I would make them pretty and use them in our bedroom. They definitely needed some sanding, new paint and a pop of color.

At first, I tried bold blue, but it just wasn't right. I kept seeing beautiful coral night stands on Pinterest and that's was I wanted to incorporate into our bedroom color palette.

I landed on "Coral Bell" as the winning color. I really like it! Painting them the same color definitely makes them look "less different" and more harmonious. Such a stunning transformation. I'm not afraid of color, as you know from my yellow china cabinet.

Stay tuned for more projects from my bedroom makeover and the big reveal. It's about 95% done.