Pages

Tuesday, December 31, 2013

2013 Highlights


When I look back on 2013 there are a few events that stand out in my mind as the "best of" and my favorite moments throughout the year. 


New York City
At the top of my list is the trip that Andrew and I took to New York in June. This was my first visit to Little Italy (which I loved!) and my first walk across the Brooklyn Bridge. We had such a fun weekend together. I wish I could do it all over again. 


Summer Vacation
In August, we took a little summer vacation with our family in Pennsylvania. It included a day at Spring Lake Beach in New Jersey, a trip to IKEA, mini golf, some relaxing and hanging out together. Just what I needed. 


Finger Lakes Wine Tasting
Denny and Marilyn visited us Mother's Day weekend and we drove to the Finger Lakes for a day of wine tasting, sight seeing and good food. It was a beautiful afternoon and a memorable day spent together. 


Stony Brook
For our 8th wedding anniversary, we took a day trip to Stony Brook State Park, hiked the trails and walked the waterfalls. Such a beautiful setting and hidden jewel to enjoy nature on a hot summer day. 


Home Office Makeover
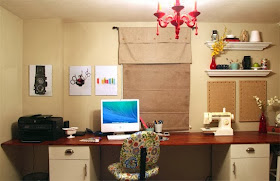
My biggest project this year was my home office makeover. Andrew and I transformed the entire room from top to bottom. We built a custom desk and I got to try many DIY projects that made the room feel more like "me". I'm so proud of the way it turned out and I love spending time in this new space. 

My favorite highlights involve traveling to fun places and spending time with loved ones. I hope to do more of that in 2014! 

Tuesday, December 24, 2013

What Christmas Means to Me


Merry Christmas!

From little Ohl me, to all of you. I'm so thankful for those who take time to visit Sohl Design. Thank you for sharing a little piece of my heart. 

Christmas is one of my favorite times of year. Not because of pretty lights, Christmas trees, cookies or gifts (although, I like all of those, very much). Christmas is important to me because it celebrates when Jesus Christ, the Son of God, my Savior, came to Earth. God's only Son became a man, with the ultimate goal of dying for us, so our sins could be forgiven. That baby in a manger was the King, with a history changing mission.

The story of "the little Lord Jesus" can be heard in Christmas songs throughout shopping malls and in carols sung by children's choirs. Joy to the world, the Lord is come! O holy night, the stars are brightly shining, it is the night of our dear Savior's birth. Away in a manger, no crib for a bed, the little Lord Jesus lay down His sweet head. Come and behold Him, born the King of angels!

It's not a fairy tale or a legend. Jesus came to Earth, through a miraculous yet humble beginning, because of God's love for you and me. Because sin needed a cure. Because we would never be good enough or capable of earning our way into Heaven. The real meaning of Christmas isn't about Santa Claus, presents under the tree or even family gatherings. It's about the greatest gift in the history of the world, God's gift to us, salvation through Jesus Christ. 

"But God demonstrated His own love toward us, in that while we were still sinners, Christ died for us." Romans 5:8

"For by grace you have been saved through faith, and that not of yourselves; it is the gift of God," Ephesians 2:8

I may not know what you think about God, religion or what life is about. But I do know that Jesus Christ is the answer. He is the reason that I live and the reason I have hope when life gets hard. He is the One I praise and thank for life's wonderful blessings and the One I pray to when I don't understand. He is the One who gives me strength when I don't have any. He is a good God, all the time. Even when things seem unfair. Even when hurt, sickness and sadness plague this world. He is there. He sees it all. And He made a way.

Jesus was born, two thousand years ago in Bethlehem, so that anyone who believes in Him can have their sins forgiven in exchange for eternal life, in paradise. John 3:16-17 says "For God so loved the world, that He gave His only begotten Son, that whoever believes in Him should not perish but have everlasting life. For God did not send His Son into the world to condemn the world, but that the world through Him might be saved." 

We need a savior. If you listen to the news for five minutes, you know this world is in dire need. We are born sinners. I'm a sinner. You're a sinner. The world is riddled with sin. That's the plain truth. The only solution is Jesus. Not being a good person. Not donating enough money. Not doing good things. Putting your faith and trust in Jesus Christ is the only way to be saved. 

It's not about religion or a list of do's and don'ts. It's about a relationship with the God of the universe, the One who created you and made your heart. It's about life transformation from the inside out. It's about having faith and believing in the One who knew you before you were born. God is offering a gift to YOU, the gift of salvation and eternal life. What better way to experience Christmas? I can't tell you how much He loves you! You are not alone on this journey of life. Jesus loves you so much that He gave His life for you.

More than anything this Christmas, my prayer is that you would find the real meaning of Christmas in Jesus. I also pray that you enjoy spending time with your loved ones and that 2014 is a year of health, joy and God's richest blessings! 


This guy (Chancho) also wants to say Merry Christmas and photobombed my photo attempts. I don't think there were cats at the original nativity. But maybe. 

Merry Christmas!


Friday, December 20, 2013

Salt Dough Ornaments


Did you ever play with salt dough when you were a kid (aka knock off Play-Doh)? I forgot all about that stuff until I was perusing Pinterest and saw a few variations of salt dough ornaments. What a cute and easy idea! I made the dough with simple ingredients I already had on hand. I got out some cookie cutters and alphabet stamps and set to work crafting a batch of homemade ornaments. This blog was especially helpful

Ingredients:
1/2 cup salt
1/2 cup water
1 cup flour

Directions:
Preheat oven to 250 degrees.
Mix ingredients together to form dough and kneed for 7-10 minutes. 
Roll out dough and cut shapes with cookie cutters. You can imprint different patterns and textures too. Be creative! 
Use a straw to poke a hole at the top for ribbon or string, before you bake.
Bake on ungreased cookie sheet for 2 hours. 
Let cool completely before painting and decorating ornaments.


I was able to stamp LOVE, JOY and HOPE onto the dough. I even made a few stamped with OHL (the perks of having a short last name!). 


I painted both sides with gold and bronze craft paint and added a twine bow to each one. They look cute and very handmade, hanging on the tree. I also added them to gift wrapping. Isn't that fun? These would be a great project to make with kids. They could even be personalized wedding or party favors. Monograms would be pretty, too. Just don't eat them! 

Thursday, December 19, 2013

DIY "Birch Box"


Are you familiar with Birch Box? I think the whole concept of Birch Box is a fun gift idea, with unique and special "surprise" items you may not have tried before. Things like makeup, accessories and skincare. All in a box you receive in the mail. What fun! 

Sometimes though, the prices are a little over budget. Why not make your own? This would be a perfect Christmas gift for any girl or guy. Just pick out a small variety of things you know they'll like - or a few of your favorite things that you want to introduce them to. I'm making two "Sohl Boxes" I'll call them, for two special friends in my life. 

Here's the type of things I'm including: comfy socks, nail polish, lip shimmer, eyeshadow, a scented pencil (I love those silly things), a mini candle, earrings. The other one has an infinity scarf instead of socks and earrings. 


Package it up in a cute little box and ad a tag or card. Who wouldn't want to receive one of these? 

If you're making one for a guy, it could include: cologne or aftershave, socks (who doesn't like new socks?), beef jerky, sports accessories (golf glove, tees, ball marker), chapstick, keychain. 

There are many possibilities and you can tailor it to the recipient and occasion. 

Monday, December 16, 2013

Chocolate Covered Pretzel Rods


There's still plenty of time to whip up some tasty Christmas treats, like chocolate covered pretzels. Perfect for handing out to friends and co-workers. I saw many varieties on Pinterest. 


I decided to use milk chocolate, mint chocolate, and white chocolate chips. The mint chips are my new favorite! Some festive colored sprinkles, jimmies and nonpareils. And of course, a tub of pretzel rods, which actually has about 85 pretzels in it for around $6. I also crushed up some candy canes for an additional topping. 


Start melting the first chocolate over a double boiler (I placed a glass bowl on top of a sauce pan with simmering water) and stir to melt. Once melted, you can remove from heat and re-heat as needed. Dip the pretzels, one by one, tapping off the excess. Add your sprinkles and set on parchment paper to solidify. You can place them in the refrigerator briefly if you need them to set up quickly. I left them on the counter while I worked on the rest and they set pretty well.


Repeat with each type of chocolate and toppings. Aren't they pretty? I ended up making all 85 or so pretzels - I felt like I was in a chocolate factory! 


I packaged them up in cellophane treat bags, 2 per bag, and tied them with a ribbon. I found some great treat bags at Big Lots that came with ribbon and little peppermint circles. 


I wanted to add a personal tag so I printed, stamped and wrote my own, including Luke 2:10-11 at the bottom, "And the angel said unto them, Fear not; for; behold, I bring you good tidings of great joy, which sill be to all people. For unto you is born this day in the city of David a Saviour, which is Christ the Lord." 


I definitely enjoyed trying a couple of these! I may need to make a batch for myself. 


Sunday, December 15, 2013

Hutch with Chevron Accents


I embellished the white hutch that now sits in my office with gray and white chevron contact paper. 


I've been seeing stylish rolls of contact paper at places like Marhshall's and TJ Maxx. When I saw a gray and white chevron pattern, I had to get it and knew I would find a use for it. 


This is the hutch we painted white a while ago. It has inlaid squares on the doors, and aways made me think it needed a little something extra. 

It used to sit in our living room.

Before we gave it a full makeover, it used to be green with light wood. 


I simply measured and cut squares for each section of the door, removed the adhesive backing and stuck them on. Instant style and character! 


It adds a modern touch to an otherwise classic looking piece of furniture. Don't you think? Contact paper is handy for a variety of projects. It would be great to add to the back of a bookcase or - call me crazy - you could use it in a closet, powder room or small space as "wallpaper" on an accent wall. How cool would that be? 

Sunday, December 8, 2013

Reupholstered Office Chair


I did quite a bit of shopping around, looking for a new desk chair for my remodeled office. I considered a variety of styles and even a Craigslist makeover, but nothing seemed to be just right, or the price tag was steep.


This is the type of chair I've had since college. A standard adjustable office chair on wheels. The green fabric was looking a little rough and cat hair stuck to it like crazy. Yuck. I thought about getting rid of it but wondered if I could save it. 


Photo from www.thedesignitch.com

I turned to Pinterest (where else) looking for inspiration and how-to. Sure enough, other people had reupholstered their regular 'ol office chairs too. This tutorial by The Design Itch was especially helpful and provided the information I needed to give it a try. 


I unassembled the chair back and seat, and removed it from the base. I had a total of 3 sides to cover with fabric. The seat base (that you sit on), the back (that you rest your back on) and the other side of the back (facing out). I don't have detailed photos of the work in progress - I was more focused on seeing if I could make it look good or not! 

Supplies:
1 yard fabric (oil cloth or regular fabric)
Staple gun and staples
Spray glue
Letter opener or thin tool to wedge fabric between boards


As you can see, my fabric has a "shine" to it because it's actually oil cloth or vinyl fabric. The bottom side is soft fabric, but the top side is coated and feels like a plastic table cloth. Perfect for easy clean up! I found this pattern at Hobby Lobby. 


I cut the fabric into the sizes I needed by tracing around the cushions and adding a couple inches extra, all the way around. I sprayed the fabric with spray adhesive, to get it to lay flat and stay in place. It worked great. 


I used a staple gun to staple the fabric all the way around the bottom of the seat. 


Here's a look at the back. I had to use a letter opener to wedge the fabric in between the back boards because there was no way I could take it apart. It fit nice and snug though.


Now I have a "new" custom office chair in a bright fun pattern. Don't toss out that old chair just yet. Consider if you could reupholster it yourself. It's easier than you think and will save you from having to purchase a new one. I love a good furniture makeover! 

Wednesday, December 4, 2013

Thanksgiving 2013


We had such a wonderful Thanksgiving break. Andrew and I piled our bags into the car and headed to Pennsylvania for a nice long weekend, filled with family, good food, relaxing, time in Philadelphia, a night on the town and even a little shopping. My heart is thankful for each person, home, place and blessing I experienced. God is so good. 

Here's a brief recap of the fun we had. 


We celebrated Thanksgiving at cousin Karen's house with extended family that I had never met until now. Such a warm, welcoming and fun group. What a blessing to be surrounded by even more family. The food was amazing. Both dinner and second dinner, after going for a brisk evening walk. There was even a craft for the kids - and kids at heart. We won't talk about a certain misfit turkey that looked different from the rest...or the fact that someone used all the feathers...

Can I just point out how handsome my husband, Andrew, and his brother, David, are? I love when they get to see each other. 


David took us to see the studio where he works in Philadelphia. What a beautiful view of the city! Not only is my bro-in-law good looking, he's a talented photographer too. 


He even got these two to smile for the camera. My in-laws really are the sweetest people you'll ever meet. 


I got to see the newest Wegmans, in Montgomery, PA. Such a big beautiful brand spanking new store. Wow. It's exciting to see Wegmans brand packages that I designed on display, in other states, for new customers to take home and enjoy. 


We got to visit the one and only, Nanna, and share a pizza, by her request. She was in good spirits and had many stories to tell - many of which were quite ridiculous funny, to say the least. I usually have to turn up my LOUD VOICE so she can hear me. She always laughs that signature laugh of hers. I'm glad we go to see her. 


Among one of the many delicious meals we had, we ate lunch at the Fitzwater Cafe. Dined at a fantastic Tex-Mex restaurant. And had breakfast at my favorite little place, The Local, before we left. There was definitely a lot of food involved in this weekend. We got to enjoy one another's company and catch up at a variety of tables and settings. It was so very nice.


And, we spent quite a bit of time in the car. It felt like we drove all over eastern Pennsylvania. I'm so thankful the winter storm they were calling for didn't show up. 


Our drive back home ended up taking 7 hours instead of 5, as apparently everyone was driving back to wherever they had to go at the same time on Sunday afternoon. Ugh. 


We made it back with David in tow, just in time to see the Vampire Weekend concert. What a fun band with such a unique sound. They were as good, if not better than their recorded music. It was a great way to conclude a busy fun-filled family weekend. 

That was my Thanksgiving, in a nutshell. 

I saw a quote that said "Let us be full of both thanks and giving." That's just how I felt. Full of thanks and wanting to give more of myself and my heart to those I love. 

I hope you are truly blessed this special time of year and know how much our Father in Heaven is head over heels in love with you.