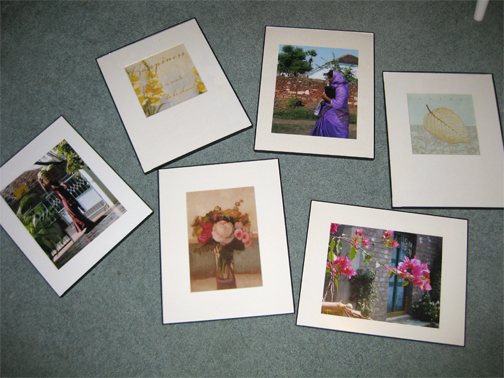
Don't you just love scrapbook paper? It's uses are virtually endless. I finally got around to completing a simple wall art project using scrapbook paper, white poster board, and 6 uniform frames.
Here's what said wall used to look like. It was time to freshen things up a bit and that particular wall needed more color. (See what I did there? Time. The clock. You missed that, didn't you)
I was struck with inspiration when I saw this wall of fun frames on Pinterest. Source here.
But my mind loves symmetry, and I've always liked a neat, orderly grouping of 4 or 6.
I just so happened to have 6 of the same pop-in frames throughout the house that would be perfect.
Using plain white poster board, I set to work cutting 6 mattes. Just like I did for my other wall of frames.
I selected 6 beautiful pieces of scrapbook paper from the craft store, in colors and patterns that would compliment my newly redecorated living room. I wanted them to really tie the colors in the room together.
I positioned them on the wall, measuring evenly between each frame. If you don't have a laser level, it's the best thing ever. Trust me.
I love how they look!
The wall feels so fresh and bright now. I look at it every time I walk in the room. The colors compliment the accent pillows on the couch and other pieces in the room.
This project was fast, super affordable, and added a lot of impact to an otherwise boring wall. You might have some frames and scrapbook paper lying around too. Pretty wall art is easier than you think.
Showing posts with label scrapbook paper. Show all posts
Tuesday, April 23, 2013
Sunday, February 10, 2013
Handmade Valentine Cards
When I was in elementary school, I always looked forward to valentine's day because I got to hand out cards to all my classmates. Sometimes we made little mailboxes for our desks. I couldn't wait to open those thin paper envelopes, read the silly notes and eat the candy (especially Sweet Tarts). Today, I still like valentines day because I have my forever valentine. I also like that it's another day out of the year to tell the ones you love, how much you love them.
Rather than purchaseoverpriced greeting cards, I decided to go old school and make a few of my own. I was in the mood for crafting with paper and glue sticks. I made Christmas cards two years ago with paper and fabric and I loved how they turned out. I decided to combine my love for typography, sewing, fabric and specialty paper once again.
I had some white card stock on hand and left over red envelopes. I cut the card stock to size.
Then I cut and glued some scrapbook paper to the card.
I only had one large doily, so I cut it into 8 sections and glued one to each card, wrapping it around to the back.
I typed up "I Love You" and "Happy Valentines Day" greetings on my computer, printing on white return address labels. I just stuck them on the card. What could be easier?
This guy was very interested in the process.
My favorite part was adding a square of burlap and hand sewing it to the card with red embroidery thread in the shape of a heart. Isn't it cute? I just love the different textures.
I signed and dated the back, which also looks cute with the heart thread and doily.
I had fun making them and I think they're better than any store bought cards! I had all of the materials on hand. You can use any combination of papers to whip up some handmade valentines, straight from your heart. They will definitely brighten your loved ones day!
Rather than purchase
I had some white card stock on hand and left over red envelopes. I cut the card stock to size.
Then I cut and glued some scrapbook paper to the card.
I only had one large doily, so I cut it into 8 sections and glued one to each card, wrapping it around to the back.
I typed up "I Love You" and "Happy Valentines Day" greetings on my computer, printing on white return address labels. I just stuck them on the card. What could be easier?
This guy was very interested in the process.
My favorite part was adding a square of burlap and hand sewing it to the card with red embroidery thread in the shape of a heart. Isn't it cute? I just love the different textures.
I signed and dated the back, which also looks cute with the heart thread and doily.
I had fun making them and I think they're better than any store bought cards! I had all of the materials on hand. You can use any combination of papers to whip up some handmade valentines, straight from your heart. They will definitely brighten your loved ones day!
Sunday, February 21, 2010
Composition Notebook Makeover
Turning a composition notebook into a beautiful journal makes a great gift, or a nice way to keep your own notes and thoughts. I have seen a few tutorials on this idea, some using fabric to make a cover. I used scrapbook paper, mod podge, and some stickers.
Purchase the notebook size of your choice. Standard composition notebooks are usually $1 or less. This smaller pocket notebook was about .79 cents, and was too cute to pass up.
One sheet of scrapbook paper is usually 12 x 12 inches, which is not large enough to cover an entire notebook. I used portions of three pieces of scrapbook paper, in corresponding patterns/colors. I started with the inside cover and wrapped it around to the font. I did not trim the scrapbook paper to size until it was completely dry. I found that it was easier to trim the edges with an x-acto knife when the paper was already attached and in place, rather than trying to cut exact size pieces before attaching them. I applied mod podge only to the back of the paper (I did not apply a top coat, but you may do so if you wish).
Where the paper ended on the front, I added the next piece of paper and wrapped it around to the back of the notebook. Then I added another piece to finish the remaining back inside cover.
The scrapbook paper pack I used included matching stickers and border strips, which are perfect for covering the seamed edges and embellishing. I propped the books open to dry on a tissue box. It may tend to warp a little, because of the mod podge applied to both sides. After it was dry, I piled a few books on top to help flatten it back out.
Here is how the little one turned out. Perfect size for your purse.

The styles and color combination's are endless!
I used a green oval sticker to personalize this one by writing my nieces name on it.
I made this hardcover notebook for my Dad (not a composition notebook). I added stickers with his initials in the bottom corner.

This is a fun and relatively easy project. Aren't these covers so much more appealing than that old black & white speckle patten?
Monday, December 14, 2009
Printable CD Jewel Case 2010 Calendar
Looking to make a personal & practical gift? I designed this set of 2010 calendar cards to fit inside a clear CD jewel case. Each month has it's own color theme and a scripture verse. I know I am not the first to come up with a calendar in this format, but the design and personalization is my own.


What you will need:
1. Print all calendar designs on plain white paper with a color printer.
2. Cut out each square with scissors or x-acto knife.
3. Round all corners with a corner punch.
4. Select scrapbook paper that you would like to use for each month (preferably NOT card stock weight, because it will be too thick). They can be all the same, or a different design for each month.
5. Cut out 12 scrapbook paper squares that are approximately 4 3/4 x 4 3/4 inches. Make sure they will fit in your CD case, you may need to trim them slightly.
6. Round all corners of your scrapbook paper with corner punch.
7. Center each calendar month on a scrapbook square of your choice, and glue with a glue stick.
8. Once all 12 cards are glued and dry, match them up in pairs in order of month (January & February, March & April, May & June...you get the idea).
9. Glue pairs of cards back to back so you will have 6 two-sided cards total. (Make sure they are in order and both facing upright)
10. When all cards are dry, assemble inside the CD case, tie with ribbon or raffia, and attach a tag or card.
11. To display the current month, gently take apart the CD case at the hinge, flip the front side and re-hinge, to create a stand up easel. The remaining month cards can be stored in the back or underneath the jewel case. Basically you are putting the sleeve side (front) of the CD case on backwards so that it won't be able to close, and instead stands tall, making a propped open L-shape. The insert tabs will hold your month in place.
Ta-da! A perfect little gift for a friend, family member or co-worker. It will sit on their desk or in their kitchen (or wherever) all year long, and they will think of you every time they turn over a new month!

FREE DOWNLOAD If you would like to download and print the calendar cards I designed, click on each of the 3 PDF links:
Jan/Feb/Mar/Apr
May/Jun/Jul/Aug
Sep/Oct/Nov/Dec
This is the first time I have attempted to link PDF's using Google docs, so let me know if it's not working correctly. If there is a better & easier way to embed PDF's into a blog post, I haven't quite figured that out yet, so I welcome your suggestions.

Enjoy! All I ask is that you use these for personal use only. Please do not sell or take credit for this design. Thank you!
What you will need:
- plain white copy paper
- color printer
- scrapbook paper
- clear CD jewel case (tray and contents removed)
- scissors/knife
- corner rounder
- glue stick
1. Print all calendar designs on plain white paper with a color printer.
2. Cut out each square with scissors or x-acto knife.
3. Round all corners with a corner punch.
4. Select scrapbook paper that you would like to use for each month (preferably NOT card stock weight, because it will be too thick). They can be all the same, or a different design for each month.
5. Cut out 12 scrapbook paper squares that are approximately 4 3/4 x 4 3/4 inches. Make sure they will fit in your CD case, you may need to trim them slightly.
6. Round all corners of your scrapbook paper with corner punch.
7. Center each calendar month on a scrapbook square of your choice, and glue with a glue stick.
8. Once all 12 cards are glued and dry, match them up in pairs in order of month (January & February, March & April, May & June...you get the idea).
9. Glue pairs of cards back to back so you will have 6 two-sided cards total. (Make sure they are in order and both facing upright)
10. When all cards are dry, assemble inside the CD case, tie with ribbon or raffia, and attach a tag or card.
11. To display the current month, gently take apart the CD case at the hinge, flip the front side and re-hinge, to create a stand up easel. The remaining month cards can be stored in the back or underneath the jewel case. Basically you are putting the sleeve side (front) of the CD case on backwards so that it won't be able to close, and instead stands tall, making a propped open L-shape. The insert tabs will hold your month in place.
Ta-da! A perfect little gift for a friend, family member or co-worker. It will sit on their desk or in their kitchen (or wherever) all year long, and they will think of you every time they turn over a new month!
FREE DOWNLOAD If you would like to download and print the calendar cards I designed, click on each of the 3 PDF links:
Jan/Feb/Mar/Apr
May/Jun/Jul/Aug
Sep/Oct/Nov/Dec
This is the first time I have attempted to link PDF's using Google docs, so let me know if it's not working correctly. If there is a better & easier way to embed PDF's into a blog post, I haven't quite figured that out yet, so I welcome your suggestions.
Enjoy! All I ask is that you use these for personal use only. Please do not sell or take credit for this design. Thank you!
Sunday, October 18, 2009
CD Case Scrapbook Cards & Envelopes
This is probably the project that started my crafting juices rolling, almost a year ago. I wanted to make something that incorporated an empty CD jewel case, to give as gifts. With the help of my dear friend "Crafty Christy," we put our heads together and came up with a little stationary set, of handmade envelops and cards, using scrapbook paper and card stock. We had one of those beautiful Victorian themed scrapbook pads that included matching stickers. We made templates for the cards and envelopes (after a few trial and errors...). A single square of the note card design was glued to the CD case cover, and embellished with stickers, then tied with raffia and a gift tag. We also included small stickers with the recipients initial for sealing the envelopes. I think the hardest part was choosing which design to make and which ones to give away (I wanted to keep them all!). Here are some photos of how they turned out...
Tuesday, September 29, 2009
You CAN organize
Yes, you CAN organize! Pun intended (he, he). I re-purposed some empty hot chocolate, breadcrumb and peanut canisters into pretty storage containers for my pens, pencils, markers and glue sticks. I simply covered them with scrapbook paper, using a glue stick, then embellished a few with ribbon. Voila! "Who has this many pens?" you ask? The girl who can't resist "a really good pen" or thinks that writing with green ink makes writing more fun...so does purple ink. You also wind up with this many pens when your husband takes 2 or 3 "free" pens from every insurance agency, job fair and church pew. At least now they have a beautiful home.
Subscribe to:
Posts (Atom)