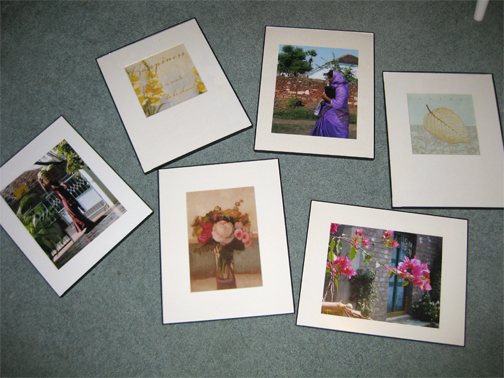
Don't you just love scrapbook paper? It's uses are virtually endless. I finally got around to completing a simple wall art project using scrapbook paper, white poster board, and 6 uniform frames.
Here's what said wall used to look like. It was time to freshen things up a bit and that particular wall needed more color. (See what I did there? Time. The clock. You missed that, didn't you)
I was struck with inspiration when I saw this wall of fun frames on Pinterest. Source here.
But my mind loves symmetry, and I've always liked a neat, orderly grouping of 4 or 6.
I just so happened to have 6 of the same pop-in frames throughout the house that would be perfect.
Using plain white poster board, I set to work cutting 6 mattes. Just like I did for my other wall of frames.
I selected 6 beautiful pieces of scrapbook paper from the craft store, in colors and patterns that would compliment my newly redecorated living room. I wanted them to really tie the colors in the room together.
I positioned them on the wall, measuring evenly between each frame. If you don't have a laser level, it's the best thing ever. Trust me.
I love how they look!
The wall feels so fresh and bright now. I look at it every time I walk in the room. The colors compliment the accent pillows on the couch and other pieces in the room.
This project was fast, super affordable, and added a lot of impact to an otherwise boring wall. You might have some frames and scrapbook paper lying around too. Pretty wall art is easier than you think.
Showing posts with label wall art. Show all posts
Tuesday, April 23, 2013
Saturday, January 7, 2012
Tween Room Makeover Reveal
Remember, about a year ago, when my niece Emma turned 10, and my sister and I started to give her bedroom a complete makeover? Well, we basically finished it...in July, but then a lot of things happened, and I never shared the results. I also didn't take very extensive photos. Shame on me. I was excited about how it turned out and I'm pretty sure Emma likes it a lot!
This bedroom was our inspiration. Lisa ordered the bedding set, which set the tone for the overall theme. White furniture and accent pieces with pops of bright pink, lime green and brown, and light aqua walls.
We found a 9 drawer dresser, tall narrow bookcase and a wicker storage chest on craigslist.
I found pink storage buckets at Target that fit nicely on the bookshelf.
I also found and painted a large cork board from a thrift store, which now hangs above Emma's repainted desk for displaying artwork and papers. The desk belonged to Lisa when she was growing up and it was her first furniture painting project. She did a great job - you go sister! I wish I had a photo of the desk. I'll work on getting one...
I made some quick wall art of Emma's name with letters out of foam core, and hung them above the dresser. You can make your own letters by following my easy tutorial. A mirror was later added to the dresser.
The metal cans I spray painted white now hold markers, crayons and art supplies. Read more about my bargain finds here.
Two cute poodles in Paris canvases were hung on the wall near the bed.
This fun zebra and polka dot "E" initial plaque found a home above Emma's night stand and lamp.
The bedding an accent pillows are so cute and fun and made the whole room come together!
BEFORE
It was very yellow, lacked a unified style and was in need of storage, organization and some new furniture.
AFTER
Now it's a fun and pretty "tween" room for Emma to enjoy and grow with! I especially like the wall color. Chris did a great job painting it. The tranquil aqua-blue compliments the bedding and existing carpet.
This was a fun project, especially because it was for my beautiful and creative niece Emma. I hope she loves her new room. Now that she's been enjoying it for 6 months! If only she could keep it clean...that's another story :)
This bedroom was our inspiration. Lisa ordered the bedding set, which set the tone for the overall theme. White furniture and accent pieces with pops of bright pink, lime green and brown, and light aqua walls.
We found a 9 drawer dresser, tall narrow bookcase and a wicker storage chest on craigslist.
I found pink storage buckets at Target that fit nicely on the bookshelf.
I also found and painted a large cork board from a thrift store, which now hangs above Emma's repainted desk for displaying artwork and papers. The desk belonged to Lisa when she was growing up and it was her first furniture painting project. She did a great job - you go sister! I wish I had a photo of the desk. I'll work on getting one...
I made some quick wall art of Emma's name with letters out of foam core, and hung them above the dresser. You can make your own letters by following my easy tutorial. A mirror was later added to the dresser.
The metal cans I spray painted white now hold markers, crayons and art supplies. Read more about my bargain finds here.
Two cute poodles in Paris canvases were hung on the wall near the bed.
This fun zebra and polka dot "E" initial plaque found a home above Emma's night stand and lamp.
The bedding an accent pillows are so cute and fun and made the whole room come together!
BEFORE
It was very yellow, lacked a unified style and was in need of storage, organization and some new furniture.
AFTER
Now it's a fun and pretty "tween" room for Emma to enjoy and grow with! I especially like the wall color. Chris did a great job painting it. The tranquil aqua-blue compliments the bedding and existing carpet.
This was a fun project, especially because it was for my beautiful and creative niece Emma. I hope she loves her new room. Now that she's been enjoying it for 6 months! If only she could keep it clean...that's another story :)
Sunday, October 17, 2010
ABC...Easy as 123
Time for a little wall art transformation. Christy asked for my help with a fun project for Maddie's room. She found this adorable ABC wall piece at Marshall's, marked down to $10! It even has birdies on it, which goes with her theme. She just wasn't sold on the color. I wasn't sure that it would match either, but being the spray-painting sista's that we are, we knew we could change it.
It was more of a lilac-purplish-pink with black lettering and white accents. Christy was envisioning it painted white with pink lettering. The graphics are carved into the sign, so re-painting them wouldn't be too difficult, because you would still see the impression. We were, however, wondering what exactly the extra black plumes under the bird's tail feathers were... not sure.
I spray painted the entire thing with about 4-5 thin coats of RUST-OLEUM American Accents smooth satin finish, in blossom white. Once it had dried and the previous colors were no longer showing through, I set to work carefully drawing in the letters and borders.
I used a medium tip pink Elmer's Painter's Pen. They have a round tip that flows liquid paint, based on pressure. Perfect for this job. You can purchase them individually or in multi-packs from any craft store.
I outlined everything in pink twice. The first coat was a little thin. I did not color in the birds because I wasn't sure how it would look and the pen was a little thick for tiny details. So I left them white. It came out better than I thought it would!
I'm glad Christy likes it too!
Photo courtesy of Brette-Ashley
Now it has a home above Maddie's crib. I couldn't be more thrilled! Isn't her room adorable? I love the fact that Christy's Mom made the crib skirt and bumper. What a beautiful gift.
Photo courtesy of Christy
The ABC sign hangs alongside three canvases that Christy made, using matching fabric from the crib bedding, that she cut into birds and branches. How cute is that?!
Photo courtesy of Christy
I like the birdhouse mobile and birdies scattered throughout the room.Photo courtesy of Christy
Maddie, your "crib" is all ready and waiting for you!Photo courtesy of Christy
I hope you enjoy your room as much as I enjoyed being able to help decorate it with your Mom!
Subscribe to:
Posts (Atom)